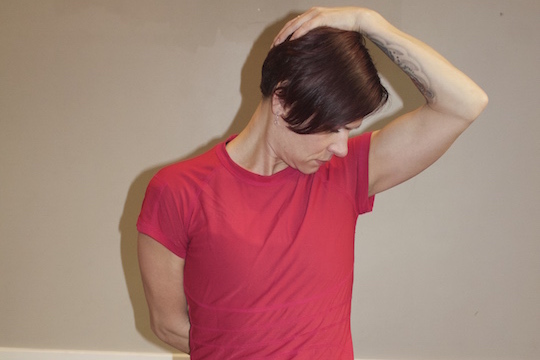
So often we talk about the importance of making sure we stretch our leg muscles and warm up our core before and after we hit the slopes. But, here’s something boarders need to remember! Whether you ride goofy (right leg forward) or regular (left leg forward), you are always looking over one shoulder or the other. Skiers don’t have this issue as they are forward facing when going down the hill.
So don’t forget to stretch your necks!!
I’ve included 2 great stretches to add to your warm up and cool down. If you add these into your stretching routine, you will be sure to minimize sore neck and shoulder muscles the day after you have boarded.
Levator Scapulae Stretch: Hold for 60 seconds and repeat on the other side. When coming out of the stretch bring your chin to your chest, give a minor rock back and forth and then look up. This will prevent the muscle from seizing on you.
The same stretch looking from the back:
Lateral (side) Neck Stretch: Hold for 60 seconds and repeat on the other side.
Have fun on the hill!
Dr. Crysta Serné
Vancouver Chiropractor, owner of Vitality Clinic, and avid boarder ?
Related Articles:
Treatment and Prevention for Skiing and Snowboarding
It’s running season! One of the first questions I ask my chiropractor and sports therapy patients is if they do more than a casual jog to warm up when they set out for their run. All too frequently, they sheepishly reply with a “nope“. It is important to start out with a very casual jog to increase general circulation and warm up the body, but you should then transition into a dynamic warm up to isolate stretching specific muscles involved in the run.
Running is one of the most complex forms of exercise in that it uses so many muscles so we want to do everything we can to prevent injuries from occurring!
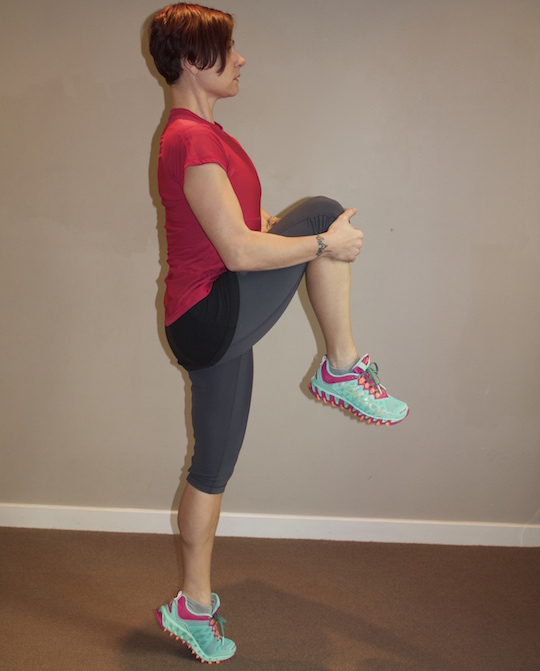
As mentioned, first start out with a casual jog for about five minutes. Moving in the direction you want to continue with, bring one knee to your chest and raise onto your toe with the other leg. Repeat with the other side. Continue this for about 30 meters. This will warm up your hamstrings and calf muscles.
Next, I like to encourage my patients to perform an inch worm (or caterpillar). It does require putting your hands on the ground so hopefully you don’t shy away from it merely because you might gets your hands a bit dirty!
Start by rolling your head forward and then follow with your torso until your hands are on the ground (if you are feeling a strong stretch in your hamstring, it is ok to start with your knees slightly bent). This is very similar to a rag doll position in yoga, and you then end up in a downward dog. Now, walk your hands forward until you are in an outstretched position; a plank. Stay there for a few seconds and then slowly walk your feet back towards your hands (if you need to bend your knees while doing this- it’s ok!). Roll your torso slowly up and finish with your head so you are once again in standing position. This dynamic stretch really helps warm up the back muscles, the hamstrings, and the quads. Repeat 5 times.
Increase the speed of your jog slightly and do a few shoulder rotations and arms swings in the process.
Lastly, you should do a “spiderman”. It involves a repeat of the rag doll, downward dog, and plank positions. However, this time, you will bend one knee and bring your foot as close to your hand as possible. Hang out there for a few seconds and then bring the other foot up so it is resting beside the other hand. Really engage those gluts and hips and pry your knees as wide apart as they are comfortable spreading. Use your shoulders to aid in the stretch if need be. With a wide stance, slowly roll your torso up, and then your head so you are once again in a standing position. This stretch really helps open up the hips, stretches the groin, and continues to lengthen the lower back muscles.
As you are continually moving in a forward direction and you are constantly moving body parts, you should notice your overall time isn’t being compromised too much!
If you have any questions or concerns, please don’t hesitate to contact the clinic and set up a consultation.
Have a great run,
Dr. Crysta Serné
Vancouver Chiropractor and owner of Vitality Clinic
Related Articles:
Running Injuries
Running in the Rain
Running and Acupuncture
5 Minutes of Running Per Day
Core, Core, and More Core
Running Shoes
This upper back mobilization can be complemented with neck stretching, upper back stretching, and other mobilizations such as the cat-cow. The sphinx mobilization is very similar to the cat-cow lumbar mobilization, but it targets upper back stiffness (thoracic spine) and neck stiffness (cervical spine). It is great for helping with poor posture and to fix neck pain.
Start on the floor in a position on your hands and knees. In the sphinx position, your hands will be on the ground directly in front of your knees so that your wrists are in contact with your knee cap. Drop your buttock to your heels. Start the mobilization by slowly arching your upper back up, similar to the “cat” movement in cat-cow.
While you arch your back, push the ground with the outside part of your palms and feel your shoulder blade muscles contract, while your shoulder blades slide laterally along your back. Retract your chin so that you are looking at your knees. Most of the movement is supposed to come from your upper back and low neck. This is the first half of the mobilization (as demonstrated by the picture on the right).
The second half of the mobilization starts by trying to push your sternum towards the ground; this is a ‘cue’, you’re not actually going near the floor. The cue is trying to force you to get as much mobilization from the upper back as possible. As you slowly bend through your upper back, start to look upwards in your neck, while keeping it relatively straight. When at full extension, hold this pose for 5 seconds and repeat the first half.
Do this mobilization 10 times in a row, take a break, do some upper back stretches, and repeat the mobilization again.
If you have any questions, please do not hesitate to contact the clinic for consultation.
Have a great day,
Dr. Lucas Tisshaw
Vancouver Chiropractor and ART Provider
Ask anyone who steps into my Chiropractor and Sport Therapy Clinic- I am a HUGE advocate for introducing core exercises into your home care regime. Stretching is important too, but it’s if you don’t have the muscle endurance to keep those joint where they are meant to be, you will find your back health doing a roller coaster ride between healthy and injury prone. Along with maintenance chiropractic adjustments, core exercises are a key ingredient to eliminate low back pain and restore healthy activities of daily living.
Once you have the basics down (pelvic tilt, prairie dog, plank, single leg heel taps, Supermans, etc) you are ready to move on to incorporating the ball into your exercises. The ball adds an extra element of dynamic stability so any core exercise done on the ball should be considered moderate to advance in difficulty. Make sure you are comfortable with where you are on the core strength continuum before initiating any of these exercises.
First, it’s important to remind you the MOST IMPORTANT factor in performing any exercise is technique. If you feel you are struggling with maintaining proper technique, stop, and do a few lesser challenging exercises to build the muscle memory back up. It is OK!- any core exercise is better than none and the last thing you want is to injure (or re-injure) yourself.
Starting, Push up Hold, or Plank Position (as shown in the feature photograph)
With the exercise ball in front of you, lower yourself down so your stomach is resting on the ball. Now walk your hands forward until you reach a point where you feel your back muscles and abdominals are working; the ball may be at the level of your knees, shins, or feet. As you gain strength in your core, you will find your able to increase the distance between the ball and your hands. Ultimately, you want to end up having only your feet and lower ⅓ of your legs touching the ball.
You should be completely flat with your legs straight. The shoulders should be positioned ever so slightly behind your hands. (*Even in the photograph, I should have my back just a tiny bit less rounded than it is!)
This position in and of itself is a great core exercise- it is considered a bilateral isometric exercise as both sides of the body are working and the muscles are neither increasing nor decreasing in length.
Hold the position until you feel a slight tremor in either your core muscles or arms, and then slowly walk your hands back towards the ball until your stomach is resting on it. Repeat 5 times.
If you are using the position as a starting position only, here are just a few of the multitude of exercises you can perform!
Jack Knife
When doing a jack knife, the key is to keep the knees as parallel with the floor as possible. You want to avoid having your knees pointing down towards the floor. By maintaining an elevated knee position, you are engaging your hip flexors and learning to perform a pelvic tilt at the end of the jack knife. Remember to keep your mouth open or sing a song as this will prevent you from holding your breath.
Repeat 10-15 times and then hold the plank position for as long as you are able to maintain proper technique.
Slowly walk your hands back towards the ball until the ball is once again positioned under your stomach. Take caution when you stand up as the blood may have rushed to your head while performing the exercise, and you may get a very mild dizzy spell. Anther way to dismount off the ball is to one at a time lower each knee/foot to the ground when you are in the plank position.
Pike Up
A pike up is an extremely challenging core exercise as you are not only balancing your feet on the ball but you are also utilizing a fair amount of shoulder and arm strength as well.
Start in the push up position and then roll the ball towards your chest with your feet while pushing your bum into the air at the same time. Once you have reached as high as you can with your bum, slowly return to the starting position.
Repeat 10-15 times.
If you want to increase the difficulty even further, lift one leg straight into the air when at the peak of the pike up.
Step Downs
This is a great unilateral core exercise as you are tapping one toe onto the ground while maintaining the plank position with the other leg on the ball.
Once in the starting position, lift one leg up and slowly lower it to the ground- do not rest your foot on the ground. It is meant to tap and then return to the plank position. Repeat on the other side. You have the option of performing all 10 on the same side before repeating with the other leg, but I enjoy the increased dynamic element when having to alternate between each leg.
If at any time during exercising you feel pain in any body part, discontinue the exercises, and consult with your Chiropractor. As always, I assume no responsibility for exercises performed without my authorization.
Lastly, it’s NEVER to early or late to start a core exercise program!
Enjoy!
Dr. Crysta Serné
Vancouver Chiropractor and owner of Vitality Clinic
If you are looking for some variation to your leg workout, look no further. Bulgarian split squats targets the quadriceps with the gluteus maximus, soleus and adductor magnus working to assist. The hamstring, gastrocnemius, gluteus medius and gluteus minimus all act as stabilizers. As it is done with the rear foot elevated on a bench, it builds lower body muscles without the additional stress on the back found with traditional squats. As a Chiropractor, this is something I am always concerned with so this is one more reason I advocate this exercise!
Why this is referred to as a Bulgarian split squat is unknown to me as the Bulgarian weight lifter never did this exercise! At any rate, it is a fabulous lower extremity exercise but I consider it a moderate to difficult exercise so use caution when attempting it.
The key to this exercise is to have adequately warmed up your body and stretched your hip flexors! Second, and equally important, is the position of your knee to your foot. NEVER allow your knee to migrate in front of the knee. Your weight should ALWAYS be on the heel of the front foot. When performing the split squat your front knee should never move- it should always remain stationary. It is your back (elevated) leg that is doing the majority of the work.
Start by positioning yourself with your back foot on the bench. I do a few hops forward to ensure I am in the key position. If you have never done this exercise before, have a spotter in front and hold onto their hands the first few times you lower down.
To increase stability, I place my hands on my waist. With the weight through your front heel, slowly lower yourself down until your knee is almost touching the ground. Raise back up with the same tempo as you lowered down with (about 4 seconds.)
Perform all 10-12 reps on the same side and then repeat on the other side.
The position you start with is key so take your time to set up!
To increase difficulty, add a dumbbell to each hand.
Enjoy,
Dr. Crysta Serné
Vancouver Chiropractor and owner of Vitality Clinic
*Dr. Serné and Vitality Clinic assumes no responsibility for anyone attempting to perform this exercise
]]>
Another great core exercise to add to your arsenal. This particular exercise focuses on internal and external obliques, transverse abdominals, and paraspinals.
I would consider this a more advanced core exercise as it takes quite a bit of dynamic stability and control when on the ball.
First, start by grabbing a weight bar you feel comfortable with when holding it straight out in front of you. Place it on your stomach and sit on a ball. Slowly roll yourself out so you are in a supine plank position on the ball. Raise the bar in front of you so it is positioned at chest height but never below your xiphoid process.
While maintaining the bar position, slowly rotate your body to one side. Make sure you are contracting your abs when returning to the starting position as this is equally important in increasing abdominal strength. Repeat on the other side.
Repeat each side 5-10 times.
Always remember to make sure you are breathing throughout the exercise. A tip I offer my patients is to always make sure their mouth is open as this prevents you from inadvertently pursing your lips together.
Have a great day,
Dr. Crysta Serné
Vancouver Chiropractor and owner of Vitality Clinic
Related articles:
Core, core, and more core
This is a great core exercise geared towards those just starting out and/or anyone who has suffered from any type of sciatic pain, disc pathology, or spinal stenosis. This core strengthening exercise is one of my personal favourites as it can easily be modified to increase or decrease difficulty depending on rehabilitation needs, as well as having the option to make it an unilateral or bilateral exercise.
Although core exercises are a fundamental component of any chiropractic treatment plan, not all core exercises are suitable for every back ailment or condition. If you have back concerns, please consult with your Chiropractor or health care practitioner to ensure this exercise is suitable for you.
Step 1: Start by lying flat on your back. Engage your lower abdominal muscles and perform a pelvic tilt. Place your hands in a triangle shape and position them directly under your sacrum. They should rest in and about the same shape as your sacrum (the triangle bone at the very base of your spine.)
Step 2: Raise both legs and place them in a table top position (both knees and hips should be at roughly 90º angles). The key to having this exercise engage the correct muscles is to ensure the hips and knees are stacked on top of each other or the knees are even slightly angulated away from the torso (as demonstrated in the picture to the right). If you allow your hips to be drawn closer to your chest, you will find the exercise much easier as it will not isolating the lower back and pelvic floor muscles.
Step 3: Slowly lower one foot towards the floor while continuing to maintain your hand position under the sacrum. This forces the pelvis into a pelvis tilt, allowing you to properly execute the move without arching your back and increased risk of injury. DO NOT HOLD YOUR BREATH! Only if you have an extremely strong core, and no current back concerns, should you consider removing your hands and performing the heel tap.
Step 4: Alternate sides and repeat each leg 5 times. It should take about 5 seconds to lower one leg to the floor.
If you would like to increase the difficulty of the exercise, attempt to perform the exercise with alternating straight legs or with both legs lowering simultaneously.
Have fun!
Dr. Crysta Serné
Vancouver Chiropractor and owner of Vitality Clinic
*Dr. Serné assumes no responsibility for anyone attempting to perform these exercises without her specific approval.
]]>Although curling may be slightly less popular than ice hockey, it is a favourite among many Canadians, young and old. Curling is sometimes viewed as a sport that is also perhaps less strenuous than others but if you curl, whether as a part of a competitive league or just for fun, you know curling is a great source of exercise (especially in the winter months when walking or summer sports may be less desirable.)
Curling actually requires a significant amount of strength, flexibility, and core stability. Along with the physical demand comes mental acuity and motor control as you attempt to be accurate with the weight, distance, and spin of the rock. While throwing the rock, almost every joint in the body is under load, all this while demanding significant range of motion.
Therefore, the most common curling injuries are musculoskeletal in nature and most often affect the back, knees, and shoulder. These injuries are normally the result of movement involving stress on your joints due to the sweeping motion. This stress is really not surprising when you think about the fact that the stones are made of pure granite and can weigh upwards of 20kg.
Tips to avoid curling injuries:
1. Stretching. This can’t be stressed enough. Heading out onto the rink thinking that the sport isn’t difficult and, therefore, stretching isn’t really necessary will cost you in the end.
A. Warm up your quads by placing your foot on a chair so your knee makes a right angle. Hang out there for 5 minutes while drinking your coffee and then repeat on the other side.
B. Stretch your shoulders by doing a cross the body arm pull. Hold for 45 seconds and repeat on the other side.
C. Stretch your forearms by applying light pressure to your hand when it is at 90 degrees to your arm.
D. Stretch your lower back by bending over at the waist until you feel a stretch in your lower back and hamstrings- you should never feel a pinch or twinge!
2. Learn the proper technique. First-time curlers: this is for you! Watching a curling tournament on the television doesn’t mean you know what you’re doing. Make sure you get some guidance or head out with someone who can give you some specific points to help you form and refine your own stance and procedure.
3. Wear the right equipment. Jeans may be stylish but they don’t belong on the rink. Wear comfortable clothing; something that allows your joints to move freely. And don’t forget gloves!
If you’ve already curled and didn’t realize how hard it can be on your body, we can help! There’s no need to suffer through pain if you’re already dealing with a curling injury.
Consider having an assessment with one of our clinic Chiropractor’s to get your body straightened out! A chiropractor can help adjust and manipulate misaligned joints that are contributing to pain and bring you relief.
Have fun on the rink,
Dr. Crysta Serné
Vancouver Chiropractor and owner of Vitality Clinic
Winter is here and a large portion of the Lower Mainland population are raising their après drink classes in celebration of the local North Shore mountains, Grouse Mountain and Cypress Mountain, opening up some of the terrain for downhill skiing and snowboarding! Not only are the local mountains open, Whistler Blackcomb has opened up this past weekend and locals and internationals are a buzz in excitement for a hopefully long and prosperous mountain season. The speed and unpredictability of the mountain slopes can result in numerous aches, pains, and serious injuries for skiers and snowboarders. A fall onto any surface from powder to packed snow groomers can result in various areas of discomfort and stiffness. Neck and lower back strains, from mild to severe, are common complaints that can often be put to rest with a few chiropractic appointments. Other common areas that chiropractic and Active Release Therapy (ART) can help with are skiing injuries to the shoulder, thumb, knee, hip, and foot.
Here are a few tips to prevent injuries from occurring in the first place:
Foam rollers and stretching prior to and after hitting the slopes can be great to help loosen up the body but access to a roller and space to do it are not always practical. Grab a lacrosse, ball hockey, or tennis ball and try to dig into those gluts and hips as well as quad and hamstrings. Body weight squats and lunges are highly recommended prior to strapping into skis or a snowboard, as well as jumping down into a downward dog/upward dog routine with a few warrior poses for 3 minutes before hitting the slopes.
Some common winter sport complaints that chiropractic can help rehab and prevent:
Neck and Shoulder:
– whiplash
– cervical strain
– rotator cuff strain
– subacromial impingement
– stiffness between the shoulder blades
Back:
– muscle strains
– disc herniation
– pain with bending over (flexion intolerant low back pain)
– tailbone sensitivity (sacro-iliac joint dysfunction with ligament sprains)
Knee:
– hamstring strains
– meniscus sprain
– patellofemoral pain syndrome
Hip:
– pelvic rotational imbalance
– gluteal strains
– groin pulls
– hip flexor tightness
Wrist and Hand:
– Skiers thumb
– wrist sprain
– joint stiffness
– forearm strain and Tennis Elbow
Interested to find out how chiropractic can enhance your ski season this year by allowing you to spend more enjoyable and pain free days on and off the hill? I will gladly have an in-person or teleconference consultation to discuss how you can benefit from individual treatment plans of chiropractic and myofascial release. Contact us today at 604-687-7678 to discuss your health treatment options and to develop a prevention routine!
Have a great day on the slopes,
Dr. Lucas Tisshaw
Vancouver Chiropractor and ART Provider
Related Articles:
Stretching For the Slopes
There are countless physical activities out there, but walking has the lowest dropout rate of them all! It’s the simplest positive change you can make to effectively improve your general health.
Research has shown that the benefits of walking and moderate physical activity for at least 30 minutes a day can help you:
1. Lubricate joints and increase circulation to muscles- essential for patients who suffer from arthritis, low back pain, or chronic muscle strains
2. Strengthen your bones
3. Reduce the risk of osteoporosis
4. Improve your balance and coordination
5. Maintain a healthy weight
6. Reduce the risk of coronary heart disease
7. Improve blood pressure and blood sugar levels
8. Improve blood lipid profile
9. Maintain body weight and lower the risk of obesity
10. Enhance mental well being
11. Reduce the risk of breast and colon cancer
12. Reduce the risk of non-insulin dependent (type 2) diabetes
13. Elevate your mood
The faster, farther, and more frequently you walk, the greater the benefits.
Consider your technique
Turning your normal walk into a fitness stride requires good posture and purposeful movements. Ideally, here’s how you’ll look when you’re walking:
1. Your head is up. You’re looking forward, not at the ground.
2. Your neck, shoulders and back are relaxed, not stiffly upright.
3. You’re swinging your arms freely with a slight bend in your elbows. A little pumping with your arms is fantastic and encouraged.
4. Ensure you’re using your core- your stomach muscles are slightly tightened and your back is straight, not arched forward or backward.
5. You’re walking smoothly, rolling your foot from heel to toe.
6. Plan your routine
As you start your walking routine, remember to:
Get the right gear. Choose shoes with proper arch support, a firm heel and thick flexible soles to cushion your feet and absorb shock. If you walk outdoors when it’s dark, wear bright colours or reflective tape for visibility.
Choose your course carefully. If you’ll be walking outdoors, avoid paths with tree roots, cracked sidewalks, potholes, low-hanging limbs or uneven turf.
Warm up. Walk slowly for five to 10 minutes to warm up your muscles and prepare your body for exercise.
Cool down. At the end of your walk, walk slowly for five to 10 minutes to help your muscles cool down.
Stretch. Again, you should walk for a few minutes to increase circulation (and warm up the muscles), and then do some light dynamic stretches (kicking heels to your bum, bringing your knee to your chest, etc). After you cool down, gently stretch your muscles as well. When you are calling down, you want to engage in static stretches (holding the position for a period of time versus elongating the muscle through moment).
The rule of thumb is you stretch prior to activity to prevent injury, and you stretch after to promote flexibility.
When to Walk
Getting into the activity habit is easiest if you choose a specific time each day. If you are a morning person, consider walking before you go to work or after the kids are off to school.
Not a morning person? A walk on your lunch break will work up an appetite and help your digestion.
Alternatively, if evening is the best time for you, schedule your walk after dinner and evening chores are completed.
The important thing is to decide on the best time for you and try not to allow other things to get in the way.
Look at your walk as an enjoyable break in your day – a time when there are no chores to do or deadlines to meet. Breathe deeply. Look up at the sky, the trees and the rooftops. Smile. Life gets better when you fit in a walk.
Have a great day,
Dr. Crysta Serné
Vancouver Chiropractor and owner of Vitality Clinic
This particular core exercise is fantastic for anyone with a disc injury (whether it’s a new injury, a flare up of an old injury, or a previously healed one.) It is also a great starting point for those just beginning a core program.
Start by lifting one arm and the opposite leg into the air (as seen in the picture to the right.) Hold for 3 seconds and repeat on the other side. Pay attention to your breathing- make sure you are not holding you breath! If you are just starting a core workout routine, stay with doing opposite arm and leg raises. Repeat each side so you end up doing 5-8 holds per side. After a few days of doing the arm and leg raises, proceed to step 2.
Now lift just your arms and chest into the air. Hold for 3 seconds. Ensure your gluts are as relaxed as possible so you work your back and not the butt!
Finally, lift both arms and legs into the air. Hold for 3 seconds.
Repeat the cycle 3-5 times. I would recommend doing this series twice daily. Please consult with your health care practitioner prior to engaging in these exercise to ensure they are suitable for you.
Have a great day,
Dr. Crysta Serné
Vancouver Chiropractor and owner of Vitality Clinic
A concussion is a traumatic brain injury that alters brain function due to the disruption of the cell membrane of nerve cells. Concussions often result after a blow to the head, but they can also occur when the head, neck, and upper body are violently shaken, such as in a car accident. Historically, people would think of concussions only when there is a loss of consciousness, but most of time there is no loss of consciousness, resulting in undetected concussions. Signs and symptoms include headaches, problems with concentration, memory, balance, pupil changes, nausea, and blurred vision.
Most concussions require rest and time to heal, with a large variance of recovery time between different cases. The best recommendation is to slowly return to sport or physical activity and do not rush back in full force until symptoms are completely gone. Chiropractors are trained to evaluate and recognize concussions as they can go hand in hand with common conditions that people seek chiropractic for: whiplash and sports injuries. During a blow to the head or an accident, it is likely that the cervical spine misaligned and resulted in reduced regular range of motion. This can result in neck, upper back, and shoulder pain that are often present with concussions and can be managed case by case with chiropractic adjustments, joint mobilizations, interferential electric current, and myofascial release technique.
If you or anyone you know “gets their bell rung” or has a known concussion, advise them to stop physical activity and be evaluated by different health professionals, including a chiropractor to help with neck and upper back muscle and joint pain, and tension headaches.
Stay safe,
Dr. Lucas Tisshaw
Vancouver Chiropractor and ART Provider
Hockey season is back and in full swing for many of us, be it professionally, minor hockey, or beer leagues across the country. For some, the summer was filled with off ice training and strengthening programs. This can go a long way for a healthy and productive season, but for most of the amateur recreational players, hitting the ice again this fall means aches, pains, strains, and stiffness anywhere from our low back, hamstrings, groins, or shoulders. American football and the NFL have a strong link with chiropractic care, while the NHL and amateur hockey in Canada and the US would benefit with further uptake of spinal adjustments and myofascial release technique, they lag behind compared to the NFL.
Like football, hockey is such a dynamic contact sport with rotation, cutting, pivots, starts and stops, and sprints; the demand on the back musculature and joints is high, and stabilizing and propelling muscles such as the hamstrings, hip flexors, and gluts can tighten up quick with the high demands placed on ice stability. These tight muscles that attach to your pelvis can quickly lead to an immobile pelvis, resulting in further low back tightness and pain during training and games. The sacro-iliac joints (SI joints), where the tail bone attaches to the hip bone, are a common site of injury in hockey players, with the pain ranging from very acute, to long lasting chronic discomfort. Spinal manipulation, myofascial release (MRT), and glut rehabilitation exercises are often the base of a treatment plan, deviating and tailored for the individual depending on the presenting case.
If you have back pain from hockey, don’t let it linger as it will likely get worse as the season goes on, get it checked out immediately. And like how many NFL players take advantage, regular chiropractic care throughout the season can go a long way to improve flexibility and decrease regular tightness from game day.
Have a great day,
Dr. Lucas Tisshaw
Vancouver Chiropractor and ART Provider
Related Articles:
Toronto Star article
NFL player helped by Chiropractic care
Regardless of any injuries, I always recommend to my chiropractor and sports therapy patients to implement closed kinetic chain exercises. This refers to having your feet firmly planted on a surface, whether it be the machine platform when doing a leg press or keeping both feet on the ground when doing lunges. The reason I advocate not doing walking lunges or leg curls is when you aren’t firmly planted, your muscles can fire incorrectly causing muscular and joint imbalances.
When performing a reverse lunge, as demonstrated in the picture to the right, knee to ankle position is imperative to ensure proper technique and prevent injuries to ankle, knees, hips, and lower back.
I usually ask patients to start out in the position with their knee on the ground. Once established, they then raise their knee off the ground and perform the lunge. The back heel always remains raised off the ground and the weight should be dispersed through the front heel.
Ideally, you should do approximately 15-20 per side, switch legs, and repeat.
Please do not perform this exercise if you have an acute injury to your lower body. Seek out an assessment and treatment before engaging in any exercise involving your ankles, knees, hips, or lower back.
Enjoy,
Dr. Crysta Serné
Vancouver Chiropractor and owner of Vitality Clinic
Everyday in my chiropractor and sports based practice I offer home care advice in the form of stretches, strengthening exercises, and hydrotherapy.
Here is my criteria and reference guide for hydrotherapy use:
Ice pack– 10 minutes on, 30 minutes off. Repeat as necessary.
Ice massage– Using an ice cube, continually move it around the area for approximately 4½ minutes. NEVER leave the ice cube on an area without moving it around or you will burn your skin. Do not engage in any activity using the affected area for at least 20 minutes post ice massage. Repeat the ice massage at least twice daily.
Heat- 20 minutes on, 20 minutes off. Repeat as necessary. Moist heat is always the best option (wrap a heat back around a moist, warm towel)
Contrast Therapy– 3 minutes of heat, followed immediately by an ice pack for 2 minutes. Repeat until the total time allocated is 15 minutes.
If the area is swollen or bruised, and the injury just happened, always refer to ice. If the area is a muscle (low back, quad, hamstring, bicep, etc), an ice pack is best. If the area is a joint (knee, ankle, shoulder, SI joint, etc), ice massage is best. The rationale behind this option is you are trying to reduce inflammation by applying ice to the area. Muscles have more blood supply than connective tissue (tendons, ligaments, or capsules) so an ice pack is sufficient to decrease the size of the blood vessels and redirect the inflammation away from the site. In order to create the same effect in the joint or connective tissue, ice massage is necessary.
Another way to determine whether to use ice, heat, or contrast is to consider how you would describe the injury or area affected.
1. If you describe the affected area as “tight or stiff” ONLY (no pain or discomfort), heat is indicated.
2. If you describe the area as “sharp, twingey, throbbing, or swollen,” ice or ice massage is indicated.
3. If you describe the area as “sore, achy, throbbing, burning, painful, and any of the above descriptors, contrast is indicated.
If you have no pain or discomfort and simply want to encourage increased flexibility of a muscle, consider applying heat to the area for 10-15 minutes. Perform your stretches immediately after.
Please note the above is meant as a general guideline! I still advocate seeking out professional advise if you have sustained an injury.
Have a great day,
Dr. Crysta Serné
Vancouver Chiropractor and owner of Vitality Clinic
Related Articles:
Epsom Salt Soaks
Contrast Showers
A stress fracture is a partial to complete hairline break in a bone, without displacement, due to repeated trauma and with no history of overt trauma.
The bones most commonly affected are:
1. Metatarsals (foot bones)- especially the second one
2. Tibia (shin)
– upper shaft more common in dancers and gymnasts
– lower shaft- more common in runners
3. Fibula- lower 1/3rd above lateral malleolus
4. Calcaneus (heel)
Metatarsal Stress fracture
1. Usually a result of repetitive microtrauma (overuse) from jumping, marching, running, dancing.
2. Bone deformity causing a weight transfer through the bones of the foot
3. Biomechanical faults creating an increased pronation of the foot or foot slap
4. Osteoporosis- women who do not have a regular or any cycle are at an increased risk.
Tibial Stress Fracture
1. Often preceded by “shin splints”
2. Biomechanical faults creating an increased pronation of the foot or foot slap
3. Overuse
4. Osteoporosis- women who do not have a regular or any cycle are at an increased risk.
Generally, patients present with acute pain but they can not determine what initiated the pain. The pain increases in its severity quite abruptly and decreases with rest.
As mentioned, stress fractures often result as an overuse injury in runners, dancers, gymnasts, or athletes involved in jumping or running. Often the athlete engages in impact on hard or uneven surfaces, increases mileage quickly, has a change in routine, or has poor footwear (or none at all.)
Prevention is key!
1. Warm up the lower leg muscles sufficiently
2. Ensure you’re wearing proper footwear whenever possible
3. Gradually increase the mileage or intensity of your training
Treatment
A. Acute
1. RICE (ice massage)
2. Electrotherapy to decrease inflammation (IFC)
3. Hydrotherapy
4. IV therapy
5. Adjustments to correct biomechanics faults
B. Chronic
1. Adjustments as necessary
2. Modify exercise program
3. Isometric and isotonic rehabilitation exercises
4. Ultrasound
5. Orthotics
Have a great week,
Dr. Crysta Serné
Vancouver Chiropractor and owner of Vitality Clinic
Related Articles:
Running injuries
Plantar Fascitis
Short Leg Syndrome
Shin Splints
]]>
By definition, shin splints is a catchall term referring to leg pain brought about by running or jumping. “Shin splints” in and of itself is not a diagnosis; it is merely a collection of symptoms.
Shins splints fall into three main categories:
1. Strain, tendonitis, or periostitis
2. Stress fracture
3. Compartment syndrome
The most common cause of shin (leg) pain is medial tibia stress syndrome (MTSS). It is a strain, tendonitis, and/or periostitis evolving the tibialis posterior and/or soleus. Most of the pain is localized to the distal 1/3rd of the medial and posterior aspect of the leg.
The second leading cause of shin splints is due to a tibialis anterior strain. The pain is localized to the anterior and lateral aspect of the leg.
As mentioned, shin splints often results as an overuse injury in runners, dancers, gymnasts, or athletes involved in jumping or running. Often the athlete engages in impact on hard or uneven surfaces, increases mileage quickly, has a change in routine, or has poor footwear (or none at all.)
Prevention is key!
1. Warm up the lower leg muscles sufficiently
2. Ensure you’re wearing proper footwear whenever possible
3. Gradually increase the mileage or intensity of your training
Treatment
A. Acute
1. RICE (ice massage)
2. Gentle stretching program
3. Taping the shin
4. Adjustments to foot and back as needed
5. Electrotherapy to decrease inflammation
6. Gentle soft tissue work
B. Chronic
1. Adjustments as necessary
2. Aggressive stretching program
3. Deep tissue massage
4. Modify exercise program
5. Isometric and isotonic rehabilitation exercises
6. Possible compressive sleeve, or continued taping of area
7. Ultrasound
Next in the series: Stress Fracture
Have a great week,
Dr. Crysta Serné
Vancouver Chiropractor and owner of Vitality Clinic
In this final article on sports nutrition, pre and post game nutrition is discussed.
Pre-Game Nutrition
What you eat several days before endurance activities affects performance. Your food the morning of a sports competition can ward off hunger, keep blood sugar levels adequate and aid hydration. Avoid high protein or high fat foods on the day of an event, as these can stress the kidneys and take a long time to digest. Empty your upper bowel by competition time.
General guidelines
1. Eat a meal high in carbohydrates.
2. Eat solid foods 3-4 hours before events and liquids 2-3 hours before.
3. Choose easily digestible foods (i.e., not fried.)
4. Avoid sugary foods/drinks within one hour of event.
5. Drink enough fluids to ensure hydration (i.e., 500ml of water 1-2 hours before exercise, and an additional 250ml within 15-30 minutes of event.)
Replenishing fluids lost to sweat is the primary concern during an athletic event. Drink 125ml of water or dilute sports drink every 10-20 minutes throughout competition.
Carbohydrate Loading
To avoid running out of carbohydrates for energy, some endurance athletes like triathletes, long-distance runners, swimmers, and cyclists load their muscles with glycogen by eating extra carbohydrates in combination with doing depletion exercises several days before an event. First, exercise to exhaustion. Your workout must be identical to the upcoming event to deplete the right muscles.
Then eat a high-carbohydrate diet (70-80 percent carbs, 10-15 percent fat, 10-15 percent protein) and do little or no exercise starting three days prior to your event. Muscles loaded with unused glycogen will be available to work for longer periods of time.
Post-Exercise Meal (to replenish muscle glycogen)
All athletes know of the importance of the pre-exercise meal. However, what and when you eat following exercise can be just as important. While the pre-exercise meals can ensure that adequate glycogen stores are available for optimal performance, the post-exercise meal is critical to recovery and improves your ability to train consistently.
What and when to eat after exercise is a common topic among athletes. The general advice has been to focus on high carbohydrate foods in order to replenish depleted muscle glycogen stores. Research has shown that carbohydrate intake within two hours of endurance exercise is essential to building adequate glycogen stores for continued training. Waiting longer than two hours to eat results in 50 percent less glycogen stored in the muscle. The reason for this is carbohydrate consumption stimulates insulin production, which aids the production of muscle glycogen. However, the effect of carbohydrate on glycogen storage reaches a plateau. More recent research has shown that combining protein with carbohydrate in the two-hours post-exercise, nearly doubles the insulin response, which results in more stored glycogen. The optimal carbohydrate to protein ratio for this effect is four grams of carbohydrate for every one gram of protein. Eating more protein than that however, has a negative impact because it slows rehydration and glycogen replenishment. The study found that athletes who refuelled with carbohydrate and protein had 100 percent greater muscle glycogen stores than those who only had carbohydrate. Insulin was also highest in those who consumed the carbohydrate and protein drink.
Protein has other important post-exercise qualities. Protein provides the amino acids necessary to rebuild muscle tissue damaged during intense, prolonged exercise. It also increases the absorption of water from the intestines and improves muscle hydration. The amino acids in protein stimulate the immune system, providing you additional resistance to colds and other infections. If you are looking for the best way to refuel your body after long, strenuous endurance exercise, a 4:1 combo of carbohydrate and protein seems to be your best choice. While solid foods can work just as well as a sports drink, a drink may be easier to digest thus making it easier to get the right ratio and meet the 2-hour window. However, research of the ratio energy drink only yields results in the United States; Accelerade and Powerbar. If you prefer energy gels or other non-protein containing sports drinks, simply add 1 Tbsp of protein powder for every 25 grams of carbohydrate to create the 4:1 ratio.
Have a great day,
Dr. Crysta Serné
Vancouver Chiropractor and owner of Vitality Clinic
Athletes who want a winning edge require optimal nutrition. When you drink enough water and eat a healthy, well-balanced diet, your body can make energy efficiently and this fuels top performances. You are more capable of making the most of your athletic talents by potentially gaining more strength, power, and endurance when you train. One needs to base their diet on a variety of factors including age, height- weight ratio, and physical condition; and the type of exercise you are doing.
Hydration
Water is the most important factor in sports nutrition. It makes up about 60 percent of body weight and is involved in almost every bodily process. Your body cannot make or store water, so you must replace what you eliminate (i.e., urine, sweat). Everyone should drink at least two liters (eight cups) of water each day; athletes require more. The most important factor in hydration is how much you drink at one time; you may quench your thirst but not sufficiently hydrate your tissues if you drink too much at one time. Maximally, you should drink 500 ml of water per hour to ensure you are hydrating your tissues and maximizing water uptake. Drink plenty of fluids before, during and after sports events to stay hydrated and avoid overheating.
When you workout or compete, especially in hot weather, try to closely match the amount of fluid you drink with the amount you lose to sweat. Cool water is the best fluid to keep you hydrated during workouts or events lasting an hour or less. Sports drinks (i.e., 6-10 percent carbohydrates) are useful for longer events. Most of these types of drinks should be diluted approximately 50 percent with water. Drink even if you are not thirsty as thirst is not a reliable way to tell if you need water. You won’t start feeling thirsty until you have already lost about 2 percent of body weight – enough to hinder performance. Interestingly, if you stop drinking water once your thirst is satisfied, you will get only about half the amount you need.
Some tips for staying hydrated
1. Drink small amounts of water frequently, rather than large amounts less often.
2. Drink cold beverages to cool your core body temperature and reduce sweating.
3. Weigh yourself after working out and drink 2-3 cups of water for every pound lost. Your body weight should be back to normal before the next workout.
4. Pay attention to the amount and colour of your urine. You should excrete a large volume that is nearly colourless. Small amounts or dark coloured urine can indicate dehydration.
Next up in the series: Fuel Sources
Have a great day,
Dr. Crysta Serné
Vancouver Chiropractor and owner of Vitality Clinic
Most running injuries occur as a result of overuse or inappropriate biomechanics. A good analogy is to think of a pulley system where the rope is your muscle and the pulley is the joint. If you have asymmetry in the way you are pulling on the “rope”, you are not going to be able to glide it over the “pulley” without using excessive effort; it will become more difficult to lift the weight at the end, thus creating friction. This in turn heats up the rope and possibly, SNAP; you now have a tear. If you realign the rope and the way it travels over the pulley, via chiropractic and sports therapy treatments, the ease at which you can pull the weight up is greatly enhanced. One will then find the energy required to complete your run is more efficiently used and your time will improve.
Here is a breakdown of some common running injuries:
Pronation Syndrome
Is a mechanical error whereby the foot is over pronated for too long in the stance phase, not held long enough throughout the phase, or the foot is pronated at the wrong time (i.e. should be supinated.) It is an all too common complaint in my practice! 60-75% of all runners have approximately 90% of their soft tissue problems associated with the foot. Typically, portion syndrome is an overuse injury as it develops over time, resulting in decreased shock absorption of the foot during the stance, decreased foot stability during the stance phase, and decreased propulsion during the stance phase.
REMEMBER if someone is flat footed, they may not necessarily overpronate.
Treatment of the common conditions causing pronation syndrome depends on the condition causing the pronation. Such conditions include:
1. Forefoot varus
2. Rearfoot varus
3. Tibia Varum
4. Genu Varum
5. Genu Valgum
6. Tricep Surae contractures
Forefoot Varus
Inversion of the forefoot with the subtalar joint in neutral and the rearfoot parallel with the ground. Requires increased calcaneal eversion to establish full forefoot contact.
Treatment:
a. can not change structural defects
b. adjust fixations, especially of the subtalar joint
c. stretch tibialis anterior strengthen the peroneal muscles
d. pronation control shoe
e. functional orthotics – medial forefoot posting if the condition does not improve with a pronation control shoe.
Rearfoot Varus
Inversion of the rearfoot (calcaneus) when the subtalar joint is in neutral.
Treatment:
a. adjust fixations – talus and subtalar
b. stretch tricep surae (calf muscles)
c. strengthen the muscles involved with inversion
d. pronation control shoe
e. orthotics with medial heel wedge (posting) if the condition does not improve with a pronation control shoe.
Tibia Varum
Congenital error where the distal 1/3rd of the tibia is adducted (curved/bowed medially) in relationship to the proximal tibia causing a varus foot in neutral.
Treatment:
a. Mild: shoe with medial rearfoot and forefoot posting- pronation control shoes
b. Severe: orthotics with varus wedge in rearfoot if not prolonged pronation; medial and posterior wedge if prolonged pronation.
Genu Varum
Inward bending of the tibia (>5° at the knee); AKA bow legged
Treatment:
a. strengthen external tibial rotators
b. stretch internal tibial rotators and hamstrings
c. orthotics with medial posting (varus wedge)
d. adjustments to the knee, hip, foot, and low back.
Genu Valgum
Excessive outward bending of the tibia (15° at the knee); AKA knock kneed.
Treatment:
a. pronation control shoe or orthotics with varus wedge
b. stretch hip extensors, knee rotators, and hamstrings.
c. strengthen hamstrings and quads.
d. adjustments to the hip, knee, foot, and low back.
Tricep Surae Contracture
Occurs when tight surae complex prohibit adequate dorsiflexion (>5°) at the ankle joint, usually with a flexible flatfoot or valgus rearfoot.
Treatment:
a. avoid high heels
b. strengthen anterior leg muscles and inverters
c. soft tissue work to the leg
d. contrast soaks to calf muscle
e. adjustments to talar, subtalar (posterior calcalneus), and navicular (inferior).
Plantar Fascitis
Definition: Strain, inflammation and pain associated with the plantar aponeurosis and flexor digitorum brevis at their attachment to the anteroinferior aspect of the calcaneal tuberosity.
Etiology (onset)- Insidious onset quickly becoming chronic in nature with acute exacerbations. Plantar fascia plays an important role in the arch support as it is the “tie beam”. Plantar fascitis is one of the most common overuse injuries in athletes, especially distance runners, basketball players, and dancers.
Treatment:
ACUTE
a. RICE
b. IFC, U/S or TENS
c. Soft tissue work- MRT and strip and bow
d. adjustments to the posterior calcalneus, medial talus, inferior navicular, and/or low back.
e. heel cup
f. home care: roll golf ball under arch 6-10 times followed by an ice massage.
CHRONIC
a. orthotics control for pronation
b. stretch calf muscles
c. strengthen muscles involved with invertion
d. deep soft tissue massage
e. heel cup
Medial Tibial Stress Syndrome (Shin Splints)
Definition: Muscle strain, tendonitis, and/or periostitis involving the tibialis posterior and/or soleus and presenting with pain along the posteromedial aspect of the middle 1/3rd of the tibia.
Etiology: Repetitive impact and most commonly occurs in runners, aerobic dancers, or other high impact sport athletes.
Contributing factors that will exacerbate this condition:
High mileage
Hard surfaces
Uneven surfaces
Sudden changes in routine
New activities
Poor shoes
Signs and Symptoms:
1. swelling
2. small lumps or nodules along the muscle attachments to the tibia
3. often the patient overpronates as well
Treatment:
ACUTE
a. ice massage
b. IFC, U/S, or TENS
c. gentle stretching
d. gentle soft tissue work of the tibialis posterior
e. adjustments to talar joint and knee
f. change shoes
CHRONIC
a. continue adjusting
b. aggressive stretching
c. deep tissue massage
d. modify exercise program
e. isometric/isotonic rehabilitation
Stress Fracture
Metatarsal Stress Fracture: Often due to repetitive microtrauma; overuse as a result of excessive running, dancing, or jumping. It is a biomechanical fault that causes increased pronation or foot slap. Osteoporosis- remember an amenorrheic (non menstruating) female athlete is at high risk for accelerating this process.
Treatment:
a. rest for 2-3 weeks
b. IFC and U/S- low setting NOT to pain
c. orthotics (usually semi-rgid, shock, or sport)
d. ROM exercises
e. stretching and strengthening of intrinsic foot muscles
Iliotibial Band Syndrome
Definition: Tendonitis along the iliotibial band causing pain along the lateral aspect of the knee.
Overuse: Most commonly due to continuing to run or cycle when symptoms are already present. Other contributing factors include over pronation, under pronation, poor shock absorption, and uneven surfaces.
Treatment:
a. soft tissue massage- MRT and strip and bow
b. decrease mileage and avoid downhill running
c. orthotics
d. stretch hip abductors, hamstrings, and gluteal muscles
e. strengthen gluteals and other hip abductors
Trochanteric Bursitis
Definition: Inflammation of the large bursa that lies between the tendon of the insertion of the gluteus maximus and posterolateral prominence of the greater trochanter.
Etiology: friction trauma from muscle hypertonicity and overuse (i.e. running with tight gluteals). Direct or micro trauma usually resulting from pronation syndrome and/or a medial rotation stance.
Treatment:
a. electrical current for two weeks
b. ice massage if acute
c. soft tissue therapy- gluteals
d. stretch gluteals
e. adjustments to the low back, SI joint, and hip
f. modify activity- avoid hills, stairs, and uneven surfaces
Iliopsoas Bursitis
Definition: Inflammation of the bursa that lays between the iliopsoas muscle and the iliopectineal eminence; it overlies the anterior-medial capsule of the hip.
Treatment: as above
Have a great day,
Dr. Crysta Serné
Vancouver Chiropractor and owner of Vitality Clinic
Knee pain and injuries, as a result of iliotibial band (ITB) syndrome, can be an extremely painful and frustrating injury that puts a big strain on both the knee and hip joints.
Knee injuries are very common among runners and cyclists. However, they doesn’t usually occur in an instant, like a hamstring strain or groin pull. It commonly starts off as a “twinge or niggle” and progress quickly to a debilitating sports injury that can sideline the best of us for weeks.
For those who aren’t familiar with ITB syndrome, let’s start by having a look at the muscle responsible for the problem. The iliotibial band is actually a thick tendon-like portion of another muscle called the tensor fasciae latae (TFL). This band passes down the outside of the thigh and inserts just below the knee.
The diagram to the right shows the side (lateral) and front (anterior) view of the thigh muscles. If you look towards the top of the diagram, you’ll see the TFL muscle. Follow the tendon of this muscle down and you’ll see that it runs all the way to the knee. This thick band of tendon is the iliotibial band.
The main problem occurs when the TFL muscle and ITB become tight. This causes the tendon to pull the knee joint out of alignment and rub against the outside of the knee, which results in inflammation and pain.
Causes
There are two main causes of knee pain associated with iliotibial band syndrome. The first is overload and the second is biomechanical errors.
Overload is common with sports that require a lot of running or weight bearing activity. This is why ITB is commonly a runner’s injury. When the TFL muscle and ITB become fatigued and overloaded, they lose their ability to adequately stabilize the entire leg. This in turn places stress on the knee joint, which results in pain and damage to the structures that make up the knee joint.
Overload on the ITB can be caused by a number of things. They include:
Exercising on hard surfaces, like concrete;
Exercising on uneven ground;
Beginning an exercise program after a long lay-off period;
Increasing exercise intensity or duration too quickly;
Exercising in worn out or ill fitting shoes; and
Excessive uphill or downhill running.
Biomechanical errors include:
Leg length differences;
Tight, stiff muscles in the leg;
Muscle imbalances;
Foot structure problems such as flat feet (pes planus); and
Gait, or running style problems such as pronation.
Immediate Treatment
First and foremost, one should have a full examination of their gait and posture to identify any postural misalignments as this may help reveal the underlying cause. This service is offered by both of the Chiropractors in the clinic- Drs. Serné and Tisshaw. They will then provide a treatment plan to correct for any biomechanical faults.
The basic treatment for knee pain that results from ITB Syndrome is no different to most other soft tissue injuries. Immediately following the onset of any knee pain, the R.I.C.E. regime should be applied. This involves Rest, Ice, Compression, and Elevation. It is critical that the R.I.C.E. regime be implemented for at least the first 48 to 72 hours. Doing this will give you the best possible chance of a complete and full recovery.
Ongoing Treatment and Prevention
Although the pain may be felt mainly in the knee, the problem may actually be caused by the muscles that support the knee; the tensor fasciae latae, quadriceps, hamstrings, and the gluteus muscles.
After the initial examination, implementation of a program to include electrical therapy, deep tissue massage, and chiropractic adjustments should be followed. It may be just what you need to help loosen up those tight muscles and restore fluid mechanical movement.
Firstly, don’t forget a thorough and correct warm up will help to prepare the muscles and tendons for any activity to come. Without a proper warm up the muscles and tendons will be tight and stiff. There will be limited blood flow to the leg muscles, which will result in a lack of oxygen and nutrients for those muscles.
Before any activity be sure to thoroughly warm up all the muscles and tendons that will be used during your sport or activity.
Secondly, flexible muscles are extremely important in the prevention of most leg injuries. When the muscles and tendons are flexible and supple, they are able to move and perform without being over stretched. If however, your muscles and tendons are tight and stiff, it is quite easy for those muscles and tendons to be pushed beyond their natural range of movement. To keep your muscles and tendons flexible and supple, it is important to undertake a structured stretching routine.
The stretch to the right is one of the best stretches for the tensor fasciae latae.
Stand upright and cross one foot behind the other. Then lean towards the foot that is behind the other. Hold this stretch for about 45 seconds, and then repeat it 3 to 4 times on each leg.
Stretching is one of the most under utilized techniques for improving athletic performance, preventing sports injury, and properly rehabilitating sprain and strain injury. Please don’t make the mistake of thinking that something as simple as stretching won’t be effective.
And thirdly, strengthening and conditioning the muscles around your knee and upper leg will help greatly to reduce the chance of knee injury and knee pain.
Have a great day,
Dr. Crysta Serné
Vancouver Chiropractor and owner of Vitality Clinic
]]>
A significant number of my chiropractic and sports therapy patients already have a TENS unit at home or end up purchasing one from me as it can be a valuable adjunct to the services I provide at the clinic. I purposefully did not go into detail about what specific conditions you should use the TENS for; it is very important you seek out your health care provider to give you specific instructions pertinent to your individual health needs. Further, the embedded article goes into detail about the machine parameters and mechanism of action. It is quite lengthy but if you have a TENS unit, the material will be very beneficial to you.
TENS is a method of electrical stimulation, which primarily aims to provide a degree of pain relief (symptomatic) by specifically exciting sensory nerves. It can be used in several different ways, each being best suited to different pain relief mechanisms. Success is not guaranteed with TENS, and the percentage of patients who obtain pain relief will vary, but would typically be in the region of 70%+ for acute pains (strains, sprains, contusions, etc) and 50%+ for more chronic pains (fibromyalgia, chronic fatigue, osteoarthritis, etc). The technique is non-invasive and has few side effects, when compared with drug therapy. The most common complaint is an allergic type skin reaction (about 2% of patients) and this is almost always due to the material of the electrodes, the conductive gel, or the tape employed to hold the electrodes in place.
TENS Treatment setup – typical applications
1. Traditional TENS (Hi TENS)
Usually use stimulation at a relatively high frequency (90 – 130 Hz) and employ a relatively narrow pulse width (start at about 100 µs). The stimulation is delivered at normal intensity – definitely there but not uncomfortable.
It is suggested that in order to reach deeper lesions, the pulse duration should be increased.
2. Acupuncture (Lo) TENS
Use a lower frequency stimulation (2-5 Hz) with wider (longer) pulses (200-250 µs). The intensity employed will usually need to be greater than with the traditional TENS – still not at the patients’ threshold, but quite a definite, strong sensation.
3. Brief Intense TENS
This a mechanism which can be employed to achieve a rapid pain relief, but note, some patients may find the strength of the stimulation too intense and will not tolerate it for sufficient duration to make the treatment worthwhile.
The pulse frequency applied is high (in to 90-130 Hz band) and the pulse width is also high (200 µs plus). The current is delivered at, or close to the tolerance level for the patient – such that they would not want the machine turned up any higher. In this way, the energy delivery to the patients is relatively high when compared with the other approaches. It is suggested 15 minutes at this stimulation level is the most it would normally be used.
4. Burst Mode TENS
As described above, the machine is set to deliver traditional TENS, but the Burst mode is switched in, therefore interrupting the stimulation outflow at rate of 2 – 3 bursts/second. The stimulation intensity will need to be relatively high, though not as high as the brief intense TENS.
Electrode placement
Target the stimulus at the appropriate spinal cord level (appropriate to the pain). Usually start with the electrodes either side of the involved area. You can use other stimulation points so long as the TENS activates the sensory nerves that enter the cord at the same neurological level. One can therefore employ nerve roots, the course of the appropriate peripheral nerve, motor points, trigger/acupuncture points, the same dermatome, myotome, or scelerotome. If the pain source is vague, diffuse, or particularly extensive, one can employ both channels simultaneously, and some health care professionals use a cross over technique in an attempt to increase the intensity of the stimulation.
TENS parameters and mechanism of action
If you have a TENS unit and would like a greater understanding of it’s applications, please consider booking a consultation with one of our Chiropractors.
Have a great day,
Dr. Crysta Serné
Vancouver Chiropractor and owner of Vitality Clinic
Stretching before any physical activity helps prevent injury and gives your muscles a chance to warm up. Here are some basic stretches for muscles that are used during cycling.
Start off by stretching your neck. Slowly roll your head from shoulder to shoulder. Repeat five times in each direction.
Sitting upright with your back straight, bring the soles of your feet together. Slowly drop your knees apart. This will slowly stretch your groin muscles. Hold this stretch for about 2 minutes.
Put your feet flat on the floor with your knees bent. Gently pull the back of your head towards your knees to stretch your upper back and neck. Hold for about 45 seconds each time.
Remain in the same position, but straighten one leg out, resting the bottom of your other foot against the inside of your thigh. Slowly bend at the hips and reach toward your outstretched ankle to stretch your hamstring muscle. Hold for about 45 seconds and repeat with the other leg.
Lie flat on your back with your left arm straight out to the side. Bend both knees to 90 degrees and gently let your knees fall towards your right. If you would like to increase the stretch, take your right hand and apply a slight downward pressure to your left knee. Also, look away from the direction that your knees are, towards your left outstretched arm. Hold this stretch for about 2 minutes and repeat with the other side.
Roll over and lie on your stomach. Place your hands about six inches to the sides of your shoulders and slightly in front of them. Stretch your lower back by pushing up with your hands and raising your chest off of the ground, try to keep your stomach on the ground. Repeat and hold for about 10 seconds each time.
Stand on one leg and bend the other leg to 90 degrees. Rest it on your bike frame and hold the stretch for 3 minutes. Repeat with the other leg. It may help to also use something to hold onto for balance.
Stand up and bend your knees slightly. Bend at the hips and reach toward your feet until you feel the stretch in your lower back and hamstrings. Hold for about 45 seconds.
Find a solid object such as a wall, tree or car that you can push up against to stretch your calf muscles. Stand a couple of feet away from the object, place your hands against it and one foot forward with the knee slightly bent. Straighten the other leg behind you by keeping the foot flat and bending the ankle. You should feel the stretch in your calf. Hold for about 45 seconds and repeat with the other leg.
Stretch your triceps by standing up with your feet a little farther apart than shoulder width. Point your left arm straight up in the air. Keep your arm up, bend the elbow and reach with your left hand behind your head towards your right shoulder blade. Use your right hand to gently pull on your left elbow. You can stretch other muscles by bending to the right slightly at your hips. Hold for about 45 seconds and repeat with the other side.
Bend your fingers and wrists back gently to stretch each hand. This will help to prevent pain and cramping from braking and holding onto the handlebars.
Enjoy your ride! Also, remember that stretching after cycling will help to increase flexibility.
Dr. Crysta Serné
Vancouver Chiropractor and owner of Vitality Clinic
In the adult, the hip is a very stable joint that rarely dislocates due to heavy ligamentous and muscular support. However, in an infant it is the most common site for congenital dislocation.
The acetabulum forms the socket the femoral head sits in, creating a “ball and socket” joint. It is comprised of the ilium (posterosuperior), ischium (posteroinferior), and pubis (anteroinferior) bones.
Anteversion refers to an internal rotation of the hip and the toes point inward
Retroversion is when the hip is externally rotated and the toes point outward.
Range of Motion
Flexion- 0-120º
Abduction (ABD)- 0-45º
Adduction (ADD)- 0-30º
Medial (internal) rotation- 0-50º (hip and knee are flexed to 90º
Lateral (external) rotation- 0-40º
Closed packed position- internal rotation with extension and ABD of femur
Ligaments
Fibrous capsule
Iliofemoral ligament-resists extension and internal rotation of the femur
Ischiofemoral ligament- resists extension and internal rotation of the thigh
Pubofemoral ligament- resists extension, external rotation and ABD of the thigh
Ligamentum teres femoris- a flattened band that attaches the fovea capitis femoris to the transverse acetabular ligament
Transverse ligament- an extension of the ace tabular labrum
Muscles
Gluteus maximus- extends and externally rotates hip
Gluteus medius (anterior fibers)- flexion, internal rotation, and ABD of hip
Gluteus medius (posterior fibers)- extension, ABD, and external rotation of hip
Gluteus minimus- flexion, internal rotation, and ABD of hip
Biceps femoris- extension and external rotation of the hip joint
Semimebranosus, semitendinosus- extension of the hip joint and internally rotates the lower extremity when knee is slightly flexed
Sartorius- longest muscle in the body. Involved in flexion, adduction and external rotation at the hip
Gracilis- ADD and flexion of the hip
Iliacus and Psoas (iliopsoas)- flexion the hip
Rectus femoris- assists with flexion of the hip when hip is flexed above 70º
ADD longus, brevis and magnus- ADD the hip
Piriformis- ABD hip
TFL- ABD and flexion of hip
Quad femoris, gemellus (superior and inferior), obturator (internal and external), piriformis, pectineus- external rotation of hip
Orthopaedic Test
Thomas
Faber
Noble Compression
Ober
Ely’s
Pediatric testing
Ortolani’s- F hip and ABD
Barlow’s
Galeazzi’s (Allis test)
telescoping
Happy studying!
Dr. Crysta Serné
Vancouver Chiropractor and owner of Vitality Clinic
The knee is one of the least secure joints in the human body. It is also the hardest joint to return to 100% following trauma so it is imperative you seek a diagnosis and treatment for an injury as soon as possible.
“Genu” is latin for knee; it actually means “bend.”
Genu Valgum: knock-kneed
Genu Varum: bow legged
Range of Motion
Resting position- 25° flexion
Close packed position- Full extension with lateral rotation of the tibia
Capsular Pattern- F, E Flexion: 0- 135°
Extension: 0-15° Medial rotation: 20-30°
Lateral Rotation: 30-40°
Muscles
Muscles that flex the leg: hamstrings, sartorius, TFL, gracilis, gastrocnemius, and popliteus.
Muscles that extend the leg: quads. The Vastus Lateralis extends with external rotation of the tibia, all others cause internal rotation of the tibia.)
Ligaments
Ligaments are strong, elastic bands of tissue that connect bone to bone. They provide strength and stability to the joint.
Four ligaments connect the femur and tibia:
The medial collateral ligament (MCL) provides stability to the inner (medial) aspect of the knee.
The lateral collateral ligament (LCL) provides stability to the outer (lateral) aspect of the knee.
The anterior cruciate ligament (ACL), in the centre of the knee, limits rotation and forward movement of the tibia in relation to the femur.
The posterior cruciate ligament (PCL), also in the centre of the knee, limits posterior movement of the tibia in relation to the femur.
Other ligaments are part of the knee capsule which is a protective, fibrous structure that wraps around the knee joint.
Inside the capsule, the joint is lined with a thin, soft tissue, called synovium.
Tendons
Tendons are tough cords of tissue that connect muscle to bone. In the knee, the quadriceps tendon connects the quadriceps muscle to the patella and provides power to extend the leg. The patellar tendon connects the patella to the tibia. Technically, it is a ligament, but it is commonly called a tendon.
O’Donahue’s Triad
Mechanism of injury- foot planted while sustaining lateral blow to outside knee
Structures involved: 1.medial meniscus 2.MCL 3.ACL
Orthopaedic Tests
Ligament Instability
1.MCL – ADD stress at 0 and 30°, McMurray’s, joint line tenderness
2.LCL – ABD stress at 0 and 30° Joint line tenderness
3.ACL and PCL- Lachman’s, Steinman’s, Ant/Post drawer
4.Meniscus – “bounce” home, joint line tenderness, Apley’s compression and rotation, McMurray’s
5.Patellofemoral- Clarke’s, apprehension, patellar PA push
6.Patellar – passive glide, apprehension, compression
7.ITB – Noble, Ober
8.Other tests – Squat and rise, single leg stand, and duck walk
Have a great weekend!
Dr. Crysta Serné
Vancouver Chiropractor and owner of Vitality Clinic
As a Chiropractor, it is my responsibility to teach my patients so they have the ability to make informed decisions about their health. Fortunately, it has been my experience patients LOVE to learn about their bodies and health. Knowledge is power and when you know the “what, why, and how” of your body, it makes it easier to stick to your treatment plan, whether at the office or at home.
I have laid out the information in such a way so any student studying anatomy can easily reference it.
General Anatomy
The ankle and foot are comprised of three important joints:
• tibiofibular
• talocrural, and
• subtalar
Also:
• 28 bones including distal tibia and fibula (not including sesamoid bones)
• 35 articulations
• 29 muscles control the bones and articulations (18 in foot and 11 in the leg)
• 3 arches: medial longitudinal, lateral longitudinal, and transverse or anterior.
Pes planus refers to flat feet (individuals who pronate are often flat footed), whereas
Pes caves refers to a high arched foot (individuals who supinates often have pes cavus).
Range of Motion
End feel – both extremes of plantar flexion (PF) and dorsiflexion (DF) have a firm capsular end feel.
Close packed position of ankle joint – full dorsiflexion and slight medial rotation of the tibia.
Closed packed position of subtalar joint – eversion.
Capsular Pattern – F, E
• Plantar flexion: 0- 50°
• Dorsiflexion: 0-20°
• Inversion: 5°
• Eversion: 5°
• Pronation: 15-30°
• Supination: 45-60°
• ABD: 10°
• ADD: 20°
Muscles
Muscles that dorsiflex the foot: tibial anterior (with inversion), extensor hallicus longus (with inversion), extensor digitorum longus (with eversion), and peroneus tertius (with eversion).
Muscles that plantarflex the foot: tibialis posterior, flexor hallicus longus and flexor digitorum longus (all with inversion.) Pure plantar flexion is achieved with the triceps surae muscle (gastrocnemius and soleus.) Peroneus longus and brevis plantar flex the foot with eversion.
Ligaments
Ligaments are strong, elastic bands of tissue that connect bone to bone. They provide strength and stability to the joint.
Four ligaments connect the femur and tibia:
The deltoid ligament (also called medial collateral ligament for the talocrural joint) provides stability to the inner (medial) aspect of the ankle. It is considered one of the strongest ligaments in the body. It resists rotation, eversion, terminal dorsiflexion, terminal plantar flexion, and AP glide of the talar joint.
The lateral collateral ligament (LCL) provides stability to the outer (lateral) aspect of the ankle. It is made up of the anterior talofibular ligament (associated with first degree sprains), calcaneofibular ligament, and posterior talofibular ligament. Together, they resist rotation, inversion, terminal dorsiflexion, terminal plantar flexion, and AP glide.
The distal tibiofibular joint gains stability from the anterior and posterior tibiofibular ligaments. Together they prevent the leg bones from spreading.
The subtalar joint is strengthened via four ligaments; the lateral talocalcaneal ligament (often sprained along with the anterior talofibular ligament when inversion occurs), medial talocalcaneal ligament, interosseus talocalcaneal ligament, and cervical ligament.
Tendons
Tendons are tough cords of tissue that connect muscle to bone. In the distal leg, the most important tendon is the Achilles tendon.
Orthopaedic Tests
Anterior drawer- tests for ligament laxity of talocrural joint
Talar tilt- tests for ligament laxity of subtalar joint
Eversion stability- Kleiger test
Homan’s (DF)- testing for DVT
Thompson- squeeze calf- tests for DVT
Neuroma squeeze
Fascial rub
Have a great day!
Dr. Crysta Serné
Vancouver Chiropractor and owner of Vitality Clinic
Proprioceptive Neuromuscular Facilitation (PNF) is a more advanced form of flexibility training that involves both the stretching and contraction of the muscle group being targeted. PNF stretching was originally developed as a form of rehabilitation, and to that effect it is very effective. It is also excellent for targeting specific muscle groups, and as well as increasing flexibility (and range of movement), it also improves muscular strength.
Warning!
Certain precautions need to be taken when performing PNF stretches as they can put added stress on the targeted muscle group, which can increase the risk of soft tissue injury. To help reduce this risk, it is important to include a conditioning phase before a maximum, or intense effort is used.
In addition, prior to initiating any form of stretching, it is vitally important that a thorough warm up be completed. Warming up prior to stretching has benefits but its primary purpose is to prepare the body and mind for more strenuous activity. One of the ways it achieves this is by helping to increase the body’s core temperature while also increasing the body’s muscle temperature. This is essential to ensure the maximum benefit is gained from your stretching.
How To Perform A PNF Stretch
The process of performing a PNF stretch involves the following. The muscle group to be stretched is positioned so that the muscles are stretched and under tension. The individual then contracts the stretched muscle group for 5-6 seconds while a partner, or immovable object, applies sufficient resistance to inhibit movement. Please note; the effort of contraction should be relevant to the level of conditioning.
The contracted muscle group is then relaxed and a controlled stretch is applied for about 20 seconds. The muscle group is then allowed 30 seconds to recover and the process is repeated 2 – 4 times.
Information differs slightly about timing recommendations for PNF stretching depending on who you are talking to. Although there are conflicting responses to the question of “how long should I contract the muscle group for?” and “how long should I rest for between each stretch?”, I believe (through a study of research literature and personal experience) that the above timing recommendations provide the maximum benefits from PNF stretching.
Stretching is one of the most under-utilized techniques for improving athletic performance, preventing sports injury, and properly rehabilitating sprain and strain injuries. Don’t make the mistake of thinking that something as simple as stretching won’t be effective.
Have a great day,
Dr. Crysta Serné
Vancouver Chiropractor and owner of Vitality Clinic
Superheroes are another core strengthening exercise I often provide my chiropractic patients. It is a unilateral, isometric stabilizing exercise as it predominately uses one side of the body at time (unilateral) and the muscle neither lengthens nor shortens (isometric.). Ensure you have mastered the prairie dog before engaging in this exercise as it is the next phase in the series; it requires more dynamic stability because you’re using an exercise ball.
When you have the exercise ball placed in front of you, place both hands on the ball and slowly lower yourself to the ball. Once your stomach and chest are lying on the ball, remove your hands and place them on the floor in front of you. Extend one leg out behind you and ensure your knee points directly towards the floor. Once you have complete control of this position, initiate bringing the opposite arm out in front of you. Do not let your body jack-knife (pike or fold towards the side of the body with the foot on the ground.)
The key to having the superhero work the appropriate muscles to their maximal efficiency is dependent on maintaining as still a position on the ball as possible. The quieter the body, the more control your muscles have and in turn the more muscle endurance they are gaining.
This is an exercise geared towards increasing the endurance of the muscle so it should be performed until failure- that is until you can no longer hold the correct technique. Rest 10 seconds and repeat up to 5 times. Repeat on the other side.
If you currently have low back pain or experience it when performing this exercise, please discontinue the exercise and consult your health care practitioner. Vitality Clinic and Dr. Serné assume no responsibility. As always, I advocate coming in for a spinal assessment to ensure your body is working at its optimal efficiency.
Have a great day,
Dr. Crysta Serné
Vancouver Chiropractor and owner of Vitality Clinic
Related Articles:
Core, Core, and More Core
Heel Pain Caused by Plantar Fasciitis and Heel Spurs
There are many forms of foot pain, but heel pain can be one of the most troubling. The most common form of heel pain in individuals is known as heel spurs or plantar fasciitis. Many resources label them one in the same, however heel spurs and plantar fasciitis are slightly different.
Plantar fasciitis occurs when the long, flat ligament on the bottom of the foot (plantar fascia) stretches irregularly and develops small micro tears that cause the ligament to become inflamed. The pain is described as being dull, aching, or sharp and can be reproduced by flexing the toes upwards (dorsiflexion) and tensing the fascia.
A heel spur is actually a type of bone growth that develops on the outside of the heel bone where the plantar fascia ligament attaches. Spurs may form when the plantar fascia becomes inflamed causing calcification or bone growth. They are often described as having a small hook shape to them, which causes pain by irritating the surrounding soft tissue.
Although the plantar fascia is invested with countless sturdy “cables” of connective tissue called collagen fibers, it is certainly not immune to injury. Middle aged, overweight, and athletic individuals are more prone to plantar problems, as are non-athletic people who spend a lot of time on their feet or suddenly become active after a long period of lethargy. A recent study found that over 50 per cent of people who suffer from plantar fasciitis are on their feet nearly all day.
Plantar fasciitis and heel spurs usually develop gradually. Heel pain may only occur when taking the first steps after getting out of bed or when taking the first steps after sitting for a long period of time. If the plantar fascia ligament is not rested, the inflammation and heel pain will continue to get worse. Other conditions or aggravating factors, such as the repetitive stress of walking, standing, running, or jumping, will contribute to the inflammation and pain. In some cases, the inflamed ligament may not heal because individuals who are developing the conditions do not completely stop the activity aggravating the symptoms.
A number of factors are directly associated with development of plantar fasciitis and heel spurs. These factors can lead to the change of the gait (the way the feet strike the ground), which may cause additional injury. Risk factors for include:
• biomechanical factors, such as decreased flexibility in the foot and ankle, imbalances in muscle strength (muscles in one leg or foot are weaker than the other), abnormal foot mechanics (when stepping down), and tightness in the achilles tendon.
• the repetitive nature of sports activities and improper training.
• sudden increases in weight.
• rapidly increasing the length of time spent on the feet.
• running or walking up steep hills.
• wearing shoes that are worn out.
• wearing shoes that do not have a cushioned sole or enough arch support.
• abruptly changing the intensity or duration of athletic activities.
The traditional remedies for plantar fasciitis include application of ultrasound, stretching and stripping out the calf, chiropractic adjustments to the talar and sub-talar joint, potentially decreasing one’s activities, purchasing better-fitting shoes (with a raised heel and arch support), icing the sore heel, and taking a natural anti-inflammatory. Another common consideration is custom orthotics.
If you believe you are suffering from the above condition, please consider booking an assessment with myself or Dr. Tisshaw.
Have a great weekend,
Dr. Crysta Serné
Vancouver Chiropractor and owner of Vitality Clinic
]]>
Not only is stretching important for flexibility, it is CRITICAL for muscle growth!
When you think about improving muscle mass, stretching is probably not the first thing that pops into your head. Were you aware that stretching plays a critical role in building muscle?
Every muscle in your body is enclosed in a bag of tough connective tissue known as fascia. Fascia is important for holding your muscles in their proper place in your body. However, your fascia may also be holding back your muscle growth. Think for a moment about your muscle development; you train them and feed them properly. They want to grow and will grow if given the right conditions, but are you giving them the opportunity? Something may be holding them back; they have no room to grow! Fascia is so dense that it doesn’t allow the muscle enough space to expand when it is proliferating. It is like stuffing a large pillow into a small pillowcase. The size of the muscle won’t change regardless of how hard you train or how well you eat because the connective tissue around your muscles is constricting the muscles within.
The best example of this is the calf muscle. The lower leg is riddled with fascia because of its tremendous weight-bearing duties in the body. It is because of this fascia that many athletes have great difficulty developing their calves.
The solution: stretching. Stretching is one of the most under-utilized techniques for improving athletic performance, preventing sports injury and properly rehabilitating sprain and strain injury. Don’t make the mistake of thinking that something as simple as stretching won’t be effective. Using the pillowcase example from above, imagine you can expand the size of the pillowcase by stretching it. Suddenly, the pillow within has more room and will expand to fill that new space. By stretching your muscles under specific conditions, you can actually stretch your fascia and give your muscles more room to grow. The key to effective fascial stretching is the “pump.” The best time to stretch to expand the bags that are holding in your muscles is when your muscles are pumped up full of blood. When your muscles are fully engorged with blood (i.e. being utilized), they are pressing against the fascia. By stretching at that time, you increase that pressure on the fascia greatly, which can lead to expansion of the fascia.
One of the major reasons Arnold Schwarzenegger had such incredible chest development was that he finished his chest workouts with dumbbell flys, an exercise that emphasizes the stretched position of the pectoral muscles. He would pump his chest up full of blood during the workout then do flys, holding the stretch at the bottom of the fly. This gave his chest room to grow to amazing proportions.
Fascial stretching is more rigorous than regular stretching but the results can be amazing. When you stretch hard enough to cause the fascia to expand, you will really feel it! When you are stretching the fascia, you should feel a powerful pulling sensation and pressure as the muscle works against the fascia to expand it.
Be sure you do not stretch so hard that you cause the muscle to tear or cause injury to yourself. You will rapidly learn to distinguish the difference between a good stretch and a bad stretch. You should not feel any sharp pain, just a steady pull.
Hold each stretch for at least 45 seconds to a minute as you must give your fascia time to be affected by the stretch. Stretch hard like this only when you have a fully pumped muscle as you must give your fascia a reason to expand. If your muscles aren’t pumped, just stretch normally.
One set of hard stretching after each set you do for a muscle group, besides the obvious benefits of increased flexibility, can have an incredible effect on the size of your muscles and their further ability to grow. DO NOT continue with any stretch that causes pain to a joint or muscle. If you are unsure of what muscles to stretch, or how to effectively stretch, please call Dr. Serné to set up an appointment.
Remember the take home to today’s discussion- stretch prior to an activity to prevent injury, but stretch after to promote flexibility and hold the stretch for at least 45 seconds.
Have a great day!
Dr. Crysta Serné
Vancouver Chiropractor and owner of Vitality Clinic
Most individuals see doctors only when they’re sick. As a “back doctor”, I am more interested in ensuring that you stay healthy and injury free, rather than seeing you when you are already down and out. By taking a preventative and proactive approach to your health, instead of a reactive one, you will continue to strive towards the goals you set in your healthy lifestyle to become stronger, leaner, and fitter. So you might be asking yourself how to accomplish this task. By seeing a chiropractor and having yourself assessed BEFORE you’re hurt is the easiest way. We are able to identify potentially problematic areas and treat them so it doesn’t become a concern later in life.
Prevention is the name of the game! Just because you don’t have PAIN, it doesn’t mean the FUNCTION of the joint, muscle, or ligament is optimal. Your back may just be a time bomb waiting to go off.
By seeing a chiropractor at Vitality Clinic, you will avoid the following:
1. Loss of normal position, which leads to restricted movement.
2. Abnormal positioning which may lead to shortened muscle tissue with decreased strength and flexibility, leg length inequalities, as well as to scar tissue development.
3. Continued pressure on nerves; due to the altered alignment this may cause numbness and tingling in the area in which the nerve travels.
4. Swelling and inflammation may develop in the disc, joints, or surrounding tissues.
5. Degenerative joint disease may occur in the affected area leading to bone spurs.
Don’t limit yourself to thinking that chiropractors are just “bone- crunchers”. I pride myself on being trained to care for ALL aspects of the patient’s health, in an attempt to identify what may potentially be the root of the problem. This may include muscle work, orthotics, nutritional supplements, and core stabilizing exercises (prairie dog, planking, and single leg bridge to name a few.)
Have a great day!
Dr. Crysta Serné
Vancouver Chiropractor and owner of Vitality Clinic
Myofascia is a strong and flexible network of connective tissue that surrounds, cushions, and supports muscles, bones, and organs – right down to the cellular level. Functionally, it forms a continuous web from head to toe.
Fascial restrictions can result from accidents, injuries, repetitive stress situations, surgical or traumatic scarring, and abnormal postures. When these injuries occur, the muscle fibers and the fascia which surrounds it become short and tight. This uneven stress can be transmitted through the fascia to other parts of the body, causing pain and a variety of other symptoms in areas you often wouldn’t expect.
Let’s use an analogy: imagine you are wearing a tight t-shirt and someone was to grab that t-shirt over your shoulder, then twist it up. One can easily see how the t-shirt would get tight, but you would still be able to move the arm. This is a primitive example of what happens with facial restriction. Myofascial Release Technique (MRT) is essentially the process that removes that bound up tissue/t-shirt.
Myofascial Release Technique is the three-dimensional application of sustained pressure and movement into the fascial system in order to eliminate restrictions. It refers to a manual muscle technique both our Chiropractors and Registered Massage Therapists may incorporate into your treatment plan. This technique requires stretching the fascia and releasing bonds between fascia, integument, muscles, and joints – with the goal of eliminating pain, improving posture, and increasing your range of motion.
MRT is an effective therapeutic approach in the relief of cervical pain, back pain, headaches, shoulder injuries, arthritic conditions, sports injuries, fibromyalgia, restriction of motion, and many more conditions. There is even a specific technique called skin rolling which can reduce the effect of cellulite!
What does a Myofascial Release Technique treatment feel like?
The pressure can range from very gentle touch to much deeper pressure. However, the pressure should never be beyond one’s tolerance level and it is therefore very important to give feedback to your practitioner during the treatment. Some people may experience a slight tingling or burning sensation in the skin (this is completely normal and safe). Others may feel a gentle to deep stretch on the area being treated. It can, at times, be quite intense, especially in the case of tissue that is holding a lot of tension and stress. It is normal for individuals to experience slight stiffness and soreness post treatment – usually that vanishes within a couple of days.
MRT is most effective in combination with chiropractic adjustments to the joints involved, whether it be spinal or extremity (ankle, shoulder, wrist, etc). Because each individual is different, the number of treatments required may vary, however a general rule is that you should notice a change in your condition within the first three treatments. Your practitioner will discuss your treatment plan and projected outcome with you during your initial session.
To conclude, MRT, often in conjunction with joint corrections, is a very effective treatment program and can significantly improve many soft tissue and orthopeadic conditions. To see if MRT is right for you, please contact the clinic @ 604.687.7678 to book an appointment.
Have a great day,
Dr. Crysta Serné
Vancouver Chiropractor and owner of Vitality Clinic
Many people these days spend the majority of their day sitting at a computer, typing or mousing.
In this posture the shoulder joint is held in a position of internal/medial rotation to accommodate the palms of the hands facing downward and engages the muscles between the shoulder blade (on the back) and the shoulder. These muscles help make up what we call the rotator cuff, and after long periods of computer work, they can become very adhered and tight, reducing the mobility of the shoulder or causing pain and stiffness.
When these muscles become chronically tight, they pull on the shoulder blade (scapula), which pull on the muscles of the upper back, giving them extra stain as both muscle groups compete to keep the scapula in position.
So if you have been experiencing pain, tightness or stiffness in upper back or back of the shoulder, try these stretches once a day, and/or come into Vitality Clinic for a massage therapy treatment to relax the muscles and decrease developed adhesions.
I would also recommend these stretches to anyone who has spent long hours working at a computer to maintain mobility and tissue circulation of the shoulder joint.
The first stretch is great as it targets the muscles that are approximated during the time at your desk. Using a towel, scarf, belt, or anything of decent length, bring your arm and hand up behind your head and PULL DOWN with your opposite arm behind your lower back until a pain free stretch is felt. Hold for 1 minute and repeat with the other side. Try it twice a day, especially at the end of the your time at the desk, as it is the inverse position to what you have been holding.
The next stretch can be easily done seated and may be repeated many times throughout the day. Bring your arm across your body and tuck your elbow into the elbow joint of your opposite arm. Use the opposite arm to pull the arm being stretched to the opposite side until you feel a pain free stretch. Hold for at least 30 seconds and repeat on the other side. I would recommend doing this 3 times per day.
Hope that helps and see you soon for a treatment!
Take Care
Sydney Beagle, RMT
]]>Carpal tunnel syndrome (CTS) is a relatively common complaint in individuals that perform constant and repetitive motions of the hand and wrist. This applies to individuals sitting prolonged periods in front of their computers; my “industrial athletes“. Also, any athlete playing a sport requiring them to repeatedly grasp something while the wrist joint is twisting and turning, are at a high risk of developing the complaint.
Sports that have a high incidence of CTS sufferers include most racquet sports, handball, swimming, body building, rowing, golf, archery, and rock climbing. However, any sport that involves prolonged use of the wrist and hand can unfortunately cause the condition.
What is CTS?
Carpal tunnel syndrome is a compression neuropathy in which the median nerve becomes entrapped in the region of the wrist. This entrapment means the thumb and the first three fingers, as well as the majority of the palm may become numb. The median nerve also supplies limited movement to the thumb through the “Thenar” muscles (the muscle pad at the base of the thumb) and so the condition normally causes partial paralysis of the thumb.
Anatomy of CTS
As already mentioned, carpal tunnel syndrome is caused by the entrapment and compression of the median nerve. This nerve runs from the forearm to the hand where it branches to supply innervations to the thumb and the first two fingers.
As it traverses the wrist area the nerve passes through the carpal tunnel, which is composed of the carpel bones and the transverse carpal ligament. The carpal bones make up the base and sides of the tunnel so that a semicircular shape or valley is formed. Stretched across this, much like a bridge that crosses the valley is the tough transverse ligament. The median nerve, along with nine tendons that give the thumb and fingers movement, pass through the tunnel and into the hand. The carpal tunnel is a rigid structure and the inner space is fixed and very confined.
Causes of CTS
Carpal tunnel syndrome is ultimately an inflammatory disease and so any job, sport, or pastime repetitive in its actions can cause either the muscles or the tendons crossing the wrist to become irritated and inflamed.
In addition to the median nerve, a set of nine tendons run through the carpal tunnel. When the protective linings, or synovial sheaths, of these tendons become swollen and inflamed this puts excessive pressure on the tendons and median nerve. This occurs because of the limited amount of space within the tunnel. Other causes of increased pressure occur when the tough transverse carpal ligament becomes swollen or when a bone fracture or break causes edema or the build up of fluids.
When the median nerve becomes compressed because of excess pressure in the carpal tunnel, the nerve signals normally transmitted through the nerve become slowed, which ultimately results in abnormal sensations in the affected hand i.e. numbness, pins and needles or a tingling, burning feeling.
Symptoms of CTS
The majority of the symptoms felt by sufferers of carpal tunnel syndrome are ultimately due to the entrapment of the median nerve. Common symptoms include:
• Weakness in the affected hand which affects grip. Many sufferers find that picking up a bag or opening a door becomes difficult because they can no longer grip with enough force.
• A feeling of numbness in the thumb, fingers (not the little finger) and the thumb-side of the palm. Alternatively some individuals may have a tingling sensation instead.
• Impaired coordination of the thumb and forefingers so that fine movements become difficult.
• Pain in the wrist and hand that can stretch up as far as the elbow. The pain that is associated with carpal tunnel syndrome is not actually caused by the nerve compression; rather it is caused by inflammation or by a bone fracture which in turn causes the nerve compression. Most cases of CTS cause absolutely no damage to the nerve itself and so when the pressure is relieved the symptoms abate.
• Tinel’s sign – this is a diagnostic test which involves tapping the carpal tunnel area lightly to see if a sharp pain is felt. If pain is felt then a diagnosis of CTS is generally given.
CTS Prevention
It is important for athletes to warm up the wrist area before they engage in any serious training so that the risk of developing carpal tunnel syndrome is reduced.
Isometric strength exercises (these are exercises where the muscles are contracted but they do not lengthen) not only warm the wrists and nearby areas up, but they also strengthen the muscles and improve blood flow. Below are a few exercises that will help to strengthen the wrist and reduce irritation.
1. Make a fist with the right hand, palm face up. Using the left hand gently push down on the fisted hand while keeping the right wrist straight.
2. Turn the fisted hand over and again push down gently on the knuckles. Remember to keep the wrist straight.
3. Turn the fisted hand so that the thumb is pointing up and repeat the exercise.
4. Next hold the first two fingers up (like the “peace” sign but with the fingers closed). Draw 5 clockwise circles and then 5 anti-clockwise circles in the air.
These simple exercises should be practiced each day, especially if one of the sports mentioned above are regularly performed. One should avoid extreme flexion as this action doubles the pressure applied to the median nerve. Extreme extension virtually triples it. Only perform warm up and strength exercises as far as feels comfortable; pushing things too far can result in the very condition you’re trying to prevent.
Because it is often inflammation of the tendon sheaths that cause carpal tunnel syndrome, flexibility exercises that reduce pressure on the tendons should also be practiced. A number of the sports mentioned in the introduction cause the muscles of the forearms to tighten, in turn causing pressure on the tendons. Thus, stretching exercises to reduce tension in the forearms will help to prevent carpal tunnel syndrome.
Interlock your fingers in front of your chest and then straighten your arms and turn the palms of your hands outwards.
Place one arm straight out in front, parallel to the ground. Rotate your wrist down and outward. Use your other hand to further rotate your hand upwards.
Another form of prevention is by using a wrist brace which helps to stabilize the wrist and stop possible overextension and flexion.
CTS Treatment
CTS is a soft tissue injury of the muscles and tendons around the wrist joint and therefore should be treated like any other soft tissue injury. Immediately following an injury, or at the onset of pain, the R.I.C.E.R. regime should be employed. This involves Rest, Ice, Compression, Elevation, and Referral to an appropriate professional for an accurate diagnosis.
It is critical that the R.I.C.E.R. regime be implemented for at least the first 48 to 72 hours. Doing this will give you the best possible chance of a complete and full recovery.
As part of the R.I.C.E.R. regime a night splint that provides support to the wrist and keeps it in a straight line (i.e. the position that applies least pressure to the median nerve) may be useful. Consult with the clinic Chiropractors prior to purchasing any supplemental material to ensure it is necessary. If the symptoms persist, it may be worth while splinting the wrist during the day so there is a lower chance of further aggravating the injury.
The next phase of treatment (after the first 48 to 72 hours) involves a number of mulitimodal chiropractic and sports therapy techniques. The application of ultrasound, TENS, heat, massage, and elbow and wrist adjustments is one of the most effective treatments for speeding up the healing process of the muscles and tendons.
Once most of the pain has been reduced, it is time to move onto the rehabilitation phase of your treatment. The main aim of this phase is to regain the strength, power, endurance and flexibility of the muscles and tendons that have been injured.
Supplements are also commonly prescribed in cases where the pain in the wrist and hand is quite severe. Nature’s Relief is a natural anti-inflammatory supplement often prescribed to combat the effects of carpal tunnel syndrome. It works by reducing the pain and also acting on the underlying cause of the condition, the inflammation.
Enjoy your day,
Dr. Crysta Serné
Chiropractor and owner of Vitality Clinic
]]>This article is for all of those computer working, desk slumping, poor driving posture, tv watching hours a day people. The most common home care exercise that I have given to clients is to stretch out their pecs. Often the tension that we feel in between the shoulder blades can result in discomfort, tiredness, crunching sounds when in motion and eventually it may progress in to a headache.
Our bodies, like our minds and lives need balance. Our pain is the
symptom of what is not happening correctly; we are out of sync. The changes that occur to the structure of our bodies after hours of poor posture and year after year that cause mid back tension.
As our bodies get used to the shortened position of hunching, our upper bodies slump forward and our should roll inwardly. Over time this allows our posterior shoulder muscles to become weak and elongated, while in the chest muscles adapt to a shorter posture. In a sense the chest over powers our backs.
In order to restore the balance, one needs to decrease the shoulder and mid back tension by opening or releasing the chest , and the shoulder stabilizers must be strengthened.
To promote a healthy chest length the pec muscles must be stretch
regularly to combat the hours of tight, pain promoting poor posture.
The best and most effective stretch I have used is done in the door
frame. Ensure that the both forearm are entirely on the door frame at shoulder height, lean through the door leading with the breast bone.
The stretch should be felt in the middle of your chest – not in your shoulder. Hold for 30 seconds, relax and repeat 2-3 times, twice a day.
Consider coming in for Chiropractic treatment and Massage. Your body will thank you for it!
Have a great day,
The Vitality Team
]]>SEMG is a clinical tool used by chiropractors in the treatment of aberrant joint movement, musculoskeletal pain, and some neurological disorders.
Surface EMG may be used to better understand how a fixated joint is causing a broader problem; it allows one to see how the mobilization of a joint has allowed the muscles to reorganize themselves. When used as at training tool, one can teach the patient how to use their body and/or muscles differently so that the joint fixation won’t replicate itself in the future.
In conditions which involve chronic pain, antalgic postures may readily be identified. Surface EMG can help find the tension in a reputed tension headache; the source of such pain can reside at a distance from the site of reported pain. Potential perpetuating factors associated with myofascial pain disorders may be described, and the SEMG feedback to the patient as part of the retraining process.
Surface electromyography can provide Chiropractors the information necessary to evaluate and follow pain sufferers with muscle impairments, as well as to establish selective treatment protocols in a scientific manner. It is well known that muscular tension maintains a substantial role in the development of the pain-spasm circuit, which can be treated using techniques of self-regulation in the form of biofeedback. Traditionally, biofeedback has been associated with relaxation training as a means to lower the emotional arousal component involved in pain.
The development of “static muscle scanning” techniques in the 1980s (Cram and Steger, 1983) better allowed the practitioner to precisely map areas of chronic asymmetric muscle tension, better describing one of the characteristic of the pain syndromes. In addition, studies of the recruitment patterns (amplitude and timing) of selected muscles may show asymmetries of muscle function amongst synergists and antagonists, providing a stronger description of how pain creates and is associated with disordered movement patterns. Both the static and dynamic sEMG findings can serve as landmarks for potential biofeedback assisted relaxation or muscle retraining sites, thus enhancing the efficacy of these endeavours.
The clinical use of SEMG in the assessment of pain related disorders was originally introduced by Edmund Jacobson in the 1930 as he began to study the effect of imagination on a variety of muscles. Janet Price, in 1948, utilized multi-site recording procedures and noted that muscle bracing patterns associated with chronic pain seemed to be asymmetrical, and eventually migrated to areas other than those of the original site of pain. Later, George Whatmore (1974) one of the students of Edmund Jacobson saw disease as resulting from “dysponesis” or inappropriate muscular efforts. He conceptualized EMG activation patterns from the point of view excessive bracing, the over-representation of emotional events, inefficient movements, or inappropriate attentional efforts.
Basmajian and Wolf were one of the first teams to document a specific neuromuscular deficit in low back pain patients. Here, they noted the lack of a “flexion relaxation” response in the erector spinae muscles of back pain patients. More recently, the work of DeLuca and his colleagues has focused on changes in the energy spectrum of the muscles in back pain patients. Using spectral technique, they have noted that these individuals tend to demonstrate a higher level of muscle fatigue than compared to normal data.
Surface EMG represents the summation of all of the alpha motor unit activity which reaches the recording electrodes. Typically, the electrodes are placed close together and the recording area is relatively small and specific. Rather than considering these recordings as representing innervations from specific nerve roots, it is more appropriate to think of this activity in terms of motor or muscle function. Such function is organized at multiple levels, including a segmental level.
Also, one should consider the dynamic interplay between the excitation associated with muscle spindle activity versus the inhibitory influences of the golgi tendon organ. The gamma motor system modulates much of the sensitivity of this interaction and is partially regulated by the cerebellum. It is also excited by nocioception. These afferent fibers give rise to an excitatory push on the gamma motor system, providing the basis for “muscle splinting” around the injured area or joint. This may also modulate posture, potentially leading to learned alpha and gamma motor behavior and antalgic postures. If this postural adjustment is maintained over an extended period of time, trigger points as well as changes in the resting lengths of muscles will ensue. The patient will eventually learn to move differently, usually restricting his or her movement, while substituting inappropriate muscle groups. Lastly, the pain patient may experience changes in emotional tone associated with pain. Recent evidence has demonstrated that the muscle spindle is activated by ANS activity associated with stress. Fear of pain may increase the resting tone in the muscle due to increased sympathetic tone.
In addition, the patient may become anxious about their pain and avoidant behavior patterns may develop. Problems of learned disuse of injured muscles or muscles associated with an injured or fixated joint, may need to be addressed. All of the above described changes in muscle function associated with pain can be documented using surface electromyographic techniques.
References:
Cram JR and Kasman GS. (1998). Introduction to Surface EMG, Aspen Publishing, Gathersburg, PA.
Donaldson S, Clasby B, Skubick D and Cram JR. (1994). The evaluation of trigger point activity using dynamic sEMG techniques, American Journal of Pain Management, 4:3, 118-122.
Kasman G, Cram JR and Wolf S. (1998). Clinical Applications in Surface EMG, Aspen Publishers, Gaithersburg, MD.
Have a great weekend,
Dr. Crysta Serné
Vancouver Chiropractor and owner of Vitality Clinic
Related Articles:
What To Expect During Your First Chiropractic Visit
Most non-traumatic conditions that produce neck pain can be managed by chiropractors, with physical/sports therapy to augment rehabilitation. One key role the chiropractor can often play is to reassure the patient that the injury is not serious. After, the goal of immediate treatment is to minimize pain and inflammation with recommendations of natural anti-inflammatory supplements, natural muscle relaxants, application of TENS, interferential current (IFC), icing, and in some cases immediate manipulation. The chiropractor will perform an examination to determine if manipulation is clinically warranted at the onset of treatment. Rehabilitation to recover lost function should address the entire kinetic chain and include an aerobic component. Return to play must be gradual. Some injured or aging patients may have to cut back on activity or cross-train to maintain an active lifestyle.
The primary care practitioner must have a rational approach to non-traumatic neck and associated upper-limb pain during all phases of rehabilitation management: acute, recovery, and maintenance. Early pain control combined with appropriate rehabilitation techniques and followed by a gradual return to activity is the key in safely putting patients where they want to be: back in action.
Immediate Treatment
General guidelines A specific diagnosis of non-traumatic neck pain is sometimes difficult to make, especially if the pain is localized. Therefore, the chiropractor’s key role can be in assuring the athlete the problem is not serious. If the patient has normal strength and reflexes and a history consistent with mechanical pain, he or she can be told with confidence that no significant herniated disk or nerve injury exists, and that resolution or control of symptoms is expected without surgery or other invasive techniques. Even in the setting of a herniated intervertebral disk with radiculopathy, aggressive conservative care frequently prevents the need for surgical intervention (5).
Management of neck pain is divided into three phases: acute (immediate), recovery/correction (manipulation/rehabilitation), and maintenance (return to play) (6.) In the acute phase, the goal is to minimize pain and inflammation. Initial treatment of acute injuries consists of manipulation, hydrotherapy, electrotherapy, and a 4- to 6-week course of anti-inflammatory drugs, most preferably natural sources, such as Nature’s Relief, or similar compilations consisting of Bromelain, Boswelia, Devil’s Claw, Tumeric, and/or Ginger. Further, frequent self-administered ice packs to the painful area for 10 to 15 minutes, and home stretching within the “vulnerable ROM.” The patient should discontinue activities that aggravate symptoms.
Manual therapy is a valuable empiric adjunct to other measures during both the acute and recovery phases of treatment. Whether high-velocity manipulation, passive mobilization, muscle energy technique, or fascial release is used, the athlete may find that pain decreases and range of motion improves faster with manual therapy, above all else.
A patient who recovers full and painless range of motion within a few days to a week can return to sports without limitations or further treatment.
Radiculopathy. In the athlete who has a cervical radiculopathy, a more prompt referral to physical therapy is warranted, in addition to the measures described above. Cervical traction, postural exercises, gentle cervical mobilization, and education are a few of the early measures a therapist might employ to help diminish radicular pain.
If the patient does not have any resolution of symptoms within 2 to 4 days of rest, ice, anti-inflammatory supplements, or if the pain prevents participation in physical therapy, referral to another health care practitioner may be warranted.
Chronic injury. In degenerative cervical pain syndromes, the initial treatment for exacerbations has some similarities to the acute pain treatment. Cervical manipulations and a short course of anti-inflammatory supplements may be used for periodic flares. In addition, moist heat applied before activity and ice packs after may also provide symptomatic relief.
Some athletes acknowledge their chronic condition and merely seek suggestions about modifying their activity. A 60-year-old male swimmer who has a degenerative disease, for example, can turn his head to the uninjured side during the crawl or switch to the back stroke to prolong the “life” of his neck. Education about mechanics such as proper form, posture, and exercises is greatly enhanced by a knowledgeable chiropractor, especially one who also specializes in sports therapy.
Rehab and Recovery
As pain and inflammation are being controlled, the athlete is advanced to the recovery phase of rehabilitation, where the goal is to recover lost function. Physical therapy is appropriate for any athlete who has acute neck pain and is slow to recover, or for a patient who has chronic neck symptoms but has never had a thorough physical therapy evaluation and treatment. The primary principle that the chiropractor and/or therapist should understand when treating neck pain is that of the kinetic chain (6.) The essence of this principle is that a functional and/or biomechanical deficit or injury anywhere in the musculoskeletal system can lead to injury elsewhere in the system.
For example, a tennis player who has poor thoracic and lumbar mobility and abnormal scapulothoracic and glenohumeral (shoulder) mechanics will stress her cervical spine more often during serving and overhead shots as she tries to maximize her reach and power. This can result in a cervical overuse syndrome. Thus, the physical therapist must address rehabilitation at all appropriate levels of the kinetic chain for a successful outcome. Cole et al (8) provide a more detailed description of kinetic chain rehabilitation in sports-related cervical spine injuries.
The patient should also work on aerobic conditioning during the acute and recovery phases because maintaining overall fitness will facilitate return to activities. Aerobic exercise can include stationary biking, brisk walking, using a stair-climbing machine, or some other non-impact activity. Upper and lower extremity strengthening and stretching should also be maintained, provided the exercises do not exacerbate the cervical condition. If at any time during the acute or recovery phases the athlete does not respond as expected, he or she should be referred to a specialist for further evaluation.
Returning to Activity
Few things are more frustrating for an athlete than to be out of sports because of an injury, but one of them is re-injury as a result of a premature return. To minimize the chance of re-injury, the athlete is promoted to the maintenance phase of rehabilitation only after certain criteria have been met. The goal in this phase is to ensure a graduated return to sports while maintaining the gains made during the recovery phase.
For the athlete who periodically has neck pain only in connection with an acute injury, one goal is pain-free cervical range of motion before full return to sports. On the other hand, an athlete who has a chronic cervical pain syndrome, such as degenerative disk disease, and who sustains a flare-up or superimposed neck injury, will return to full activities when he or she reaches the “familiar” level of pain. Cervical rotation and lateral bending should approach symmetry, with right and left values within about 10% of one another. The range of cervical flexion and extension cannot be compared with values from an uninjured side, so clinical judgment based on normal ranges of motion must be used.
Motor strength of the neck muscles, another return-to-play criterion, is difficult to quantify in the clinician’s office, but a good qualitative attempt should be made. The patient should offer strong, pain-free cervical resistance to the examiner’s hand in flexion, extension, lateral bending, and rotation. Rotation and lateral bending should be relatively symmetrical side to side. Extension should be more powerful than flexion. Return to full athletic participation should be delayed if a gross side-to-side discrepancy is noted.
In patients who have cervical radiculopathy, the examiner should note side-to-side differences in extremity range of motion and strength. The involved limb should be pain-free in motion with no further dysesthesias, and have at least 80% to 85% of the range of the uninvolved side. Motor strength in the myotome of the affected limb should have recovered to at least 75% of that of the opposite side before the patient begins a gradual return to sports (6).
The athlete should resume his or her sport at a level or intensity that allows pain-free participation, then increase the time, distance, weight, number of throws, etc, by approximately 10% each week. For example, if the 60-year-old swimmer mentioned previously had swum 30 laps per session prior to a flare of his symptoms, he might start at 15 laps and increase by 1.5 to 2 laps each week until he reached his previous level. If the patient’s symptoms return at any point, he or she must drop back to the previous pain-free level and continue working on strength, flexibility, and good mechanics before attempting to advance. A qualified coach can be invaluable in helping many athletes develop proper technique, which will facilitate injury-free participation.
Modifying Behaviours
Whether the patient is a recreational or professional athlete, at some point aging may dictate an alteration in activity. Some patients by the age of 30 or 40, many by the age of 50, and most by the age of 60 will have to spend more and more time working to maintain neck flexibility and strength for sports that require significant cervical movement.
For the young athlete who finds cervical injuries occurring more frequently, or the older athlete who has chronic cervical pain, the chiropractor must ensure that appropriate radiologic studies (usually plain radiographs) have ruled out a serious problem, and that the rehabilitation program has been pushed to its maximum benefit. If a complete and well-rounded exercise program is not preventing or minimizing neck pain during sports, the athlete must consider other options. These may include tolerating a certain amount of discomfort or taking periodic breaks of 1 to 3 months from a sport to allow the neck to recover, much as a professional athlete does during the off-season.
Maintenance cervical adjustments, sports massage, IMS and/or acupuncture are a valuable adjunct to control pain for most patients. These treatments, however, should serve to compliment an active rehabilitation program, not replace it.
Another reasonable approach would be to help the patient understand the ideas of conservation (cutting back intensity and/or frequency to improve longevity) and cross-training. For example, our swimmer with chronic neck pain who swims freestyle 5 days a week for 30 minutes may benefit from mixing the backstroke into his routine, limiting sessions to 20 minutes 3 days a week, and working out on a cross-country ski machine the other 2 days. The use of alternative training techniques will allow injured or aging patients to maintain an active lifestyle.
References
1. Cantu RC: Sports medicine aspects of cervical spinal stenosis. Exerc Sport Sci Rev 1995;23:399-409
2. Torg JS (ed): Athletic Injuries to the Head, Neck, and Face, ed 2. St Louis, Mosby Year Book, 1991
3. Torg JS: Cervical spinal stenosis with cord neurapraxia and transient quadriplegia. Clin Sports Med 1990;9(2):279-296
4. Wiesenfarth J, Briner W Jr: Neck injuries: urgent decisions and actions. Phys Sportsmed 1996;24(1):35-41
5. Saal JS, Saal JA, Yurth EF: Nonoperative management of herniated cervical intervertebral disc with radiculopathy. Spine 1996;21(16):1877-1883
6. Kibler WB: A framework for sports medicine: evaluation and treatment. Phys Med Rehabil Clin North Am: Sports Medicine 1994;5(1):1-8
7. Travell JG, Simons DG: Myofascial Pain and Dysfunction: The Trigger Point Manual. Baltimore, Williams & Wilkins, 1983
8. Cole AJ, Farrell JP, Stratton SA: Cervical spine athletic injuries: a pain in the neck. Phys Med Rehabil Clin North Am: Sports Medicine 1994;5(1):37-68
Have a great day,
Dr. Crysta Serné
Vancouver Chiropractor and owner of Vitality Clinic
Related Articles:
Care of Head, Neck, and Upper Back
Neck Pain and Injuries
Upper Body Stretches
Stretches for Nursing Moms (or anyone else with stiff upper Back)
Mouse Placement
Sleeping Positions to Alleviate Neck Pain
Correcting Faulty Posture
Pillow Talk
Muscle contusions, commonly referred to as bruises, are one of those injuries just about everyone has had at one point or another. In fact, bruises are the second most common sports injury after strains. Although not considered a serious injury, they often cause mild discomfort and can create discolouration of the skin.
What is a bruise and how do they occur?
Bruises are the result of your body colliding with a solid object, (or a solid object colliding with your body). When this occurs, the soft tissues under your skin (muscle fibers and connective tissue) are crushed but the skin does not break or rupture. When soft tissue is damaged, blood from the ruptured capillaries leaks out under the skin and pools, causing the area to swell and form a red or purplish mark that can be sore and tender to touch. The symptoms associated with bruises are pain, swelling, and restricted movement.
Types of Bruises
Like muscle strains, bruises are usually graded into three categories and these are referred to as: first; second; or third degree depending on their severity. A first degree bruise is the least severe. It is the result of a minor rupture of the capillaries and is accompanied by mild pain, some swelling, and stiffness. There is usually very little loss of function as a result of a first degree bruise. A second degree bruise is the result of a moderate rupture of the capillaries and increased bleeding. There is also increased swelling and pain associated with a second degree bruise, and a moderate loss of movement at the injury site. A third degree bruise is the most severe of the three. A third degree bruise is the result of a major rupture of the capillaries and will result in massive swelling, severe pain and instability around the injury site.
Who Bruises?
Anyone can get a bruise, although people involved in contact sports are most at risk. But why do some people bruise more easily than others? The severity of a bruise can depend on a number of things: how tough a person’s skin tissue is; the general health of the underlying muscles and soft tissue; medications one may be on; or age. Age can be a major contributor because as we get older our blood vessels tend to become more fragile.
Immediate Treatment
The immediate treatment of any soft tissue injury is vital. Proper care and treatment now will go a long way towards a full recovery later. It is likely that most first degree bruises will require very little treatment, however second and third degree bruises should be treated with the following. Without a doubt, the most effective, initial treatment for bruises and contusions is the R.I.C.E.R. regime. This involves the application of (R) rest, (I) ice, (C) compression, (E) elevation, and obtaining a (R) referral for appropriate medical treatment. R.I.C.E.R. forms the first, and perhaps most important stage of injury rehabilitation, providing the early base for the complete recovery of injury. Where the R.I.C.E.R. regime has been used immediately after the occurrence of an injury, it has been shown to significantly reduce recovery time.
R.I.C.E.R.
R: (rest) It is important that the injured area be kept as still as possible. This will help to slow down blood flow to the injury and prevent any further damage.
I: (ice) By far the most important part. The application of ice will have the greatest effect on reducing bleeding, swelling, and pain. Apply ice as soon as possible after the injury has occurred. How do you apply ice? A gel molding ice pack is usually the best. If you don’t have an ice pack readily available, cold water from a tap is better than nothing at all. When using ice, be careful not to apply it directly to the skin, unless you are instructed to do an ice massage. Placing an ice pack directly on the skin can cause “ice burns” and skin damage. Wrapping the ice in a damp towel generally provides the best protection for the skin. The most common recommendation is to apply ice for 10 minutes on, 30 minutes off every 2 hours for the first 48 to 72 hours. Be aware that children and elderly individuals have a lower tolerance to ice and cold. A frozen spoon is a great option for infants that may have bumped and bruised themselves. Finally, people with circulatory problems are also more sensitive to ice so if one feels a burning sensation, remove the ice until the area returns to a light pink colour or neutral skin tone. Remember to keep these things in mind when treating yourself or someone else with ice. Obviously, there will be a slight discomfort from the cold, but as soon as pain or excessive discomfort is experienced, it’s time to remove the ice. It’s much better to apply ice for 3 to 5 minutes a couple of times an hour, than not at all. IN some cases, a contrast between heat and cold is recommended, but please ask your therapist befoe applying this method.
C: (compression) Compression actually achieves two things. Firstly, it helps to reduce both the bleeding and swelling around the injury, and secondly, it provides support for the injured area. Use a firm, elastic, and size appropriate compression bandage to cover the entire injury site. Start wrapping from the point farthest from the heart (distal) and work inward from there (medial.)
E: (elevation) Simply raise the injured area above the level of the heart at all possible times. This will further help to reduce the bleeding and swelling.
R: (referral) If the injury is severe enough, it is important that you consult a professional sports therapist or a qualified doctor (yes, Chiropractors are qualified doctors!!) for an accurate diagnosis. They will be able to tell you the full extent of the injury. Before we finish with the initial treatment and move onto the next phase of the rehabilitation process, there are a few things that you must avoid during the first 72 hours. Be sure to avoid any form of heat at the injury site. This includes heat lamps, heat creams, spas, Jacuzzis, and saunas. Avoid all movement and massage of the injured area. Also avoid excessive alcohol. Any of the aformentioned may increase bleeding, swelling, and pain of your injury.
After the first 48 to 72 hours
First, you must keep active! Don’t listen to anyone who tells you to do nothing. Now is the time to start some gentle rehabilitation. Most of the swelling will have subsided after the first 48 to 72 hours and you are now ready to start light activity. Light activity will not only promote blood circulation, but it will also activate the lymphatic system. The lymphatic system is vital in clearing the body of toxins and waste products, which can accumulate in the body following a sports injury. Activity is the only way to activate the lymphatic system.
Before we move on, a quick word of warning. Never do an activity that hurts the injured area. Of course you may feel some discomfort, but NEVER push yourself to the point where you’re feeling pain. Listen to your body; don’t over do it at this early stage of the recovery.
Next, you now need to start three vital treatments. The first is commonly used by Sports Therapists (and Physiotherapists), and primarily involves increasing the blood supply to the injured area. The aim is to increase the amount of oxygen and nutrients to the damaged tissues. Sports Therapists accomplish this aim by using a number of activities to stimulate the injured area. The most common methods used are ultrasound, IFC, TENS, and heat.
Ultrasound, IFC, or TENS (Transcutaneous Electrical Nerve Stimulation) simply uses a light electrical pulse to stimulate the affected area. While heat, in the form of a ray lamp or heated gel pack, is very effective in stimulating blood flow to the damaged tissues, once you are out of the danger zone of the first 72 hours.
Secondly, to speed up recovery and repair the damage tissue it is vital that you initiate gentle massage the injured area and connecting muscles. While ultrasound and heat will help the injured area, they will not remove the scar tissue and other damaged tissue; only massage will be able to do that. Initially, the injured area may be quite tender, so start with a very light stroke and gradually increase the pressure until you’re able to tolerate a firmer stroke.
Just a few final points before we move on. Be sure to drink plenty of fluid during your injury rehabilitation. The extra fluid will help to flush a lot of the waste products from your body. Also, I recommend you consider purchasing a natural anti-inflammatory and muscle relaxant (both are available at Vitality Clinic. Topical creams such as Arnica are also beneficial for local relief.
Lastly, gentle stretching should also be included as part of your heat and massage treatment. This will help to regain your range of motion and realign the damaged muscle fibers. While working on increasing the flexibility of the injured area, it’s also important to increase the flexibility of the muscle groups around the injured area. Once your range of motion has returned to normal and movement of the injured area is pain free, you can start to implement some more active rehabilitation techniques like strength work, balance drills and sport specific training be included as part of your heat and massage treatment. This will help to regain your range of motion and re-align the damaged muscle fibers. While working on increasing the flexibility of the injured area, it’s also important to increase the flexibility of the muscle groups around the injured area. Once your range of motion has returned to normal and movement of the injured area is pain free, you can start to implement some more active rehabilitation techniques like strength work, balance drills and sport specific training.
Have a great day,
Dr. Crysta Serné
Vancouver Chiropractor and owner of Vitality Clinic
This morning habit will leave you energized all day!
Alternating or contrast showers are a simple yet efficient way to improve circulation, stimulate the nervous system, speed healing, modulate immune response and generally improve energy and detoxification.
During your morning shower, turn the water up to a comfortably warm temperature, and remain within the warm water for at least 3 minutes. Following this warm phase, turn the temperature down as low as you can handle, and stay under the cold stream for up to 30 seconds. Following the cold stage, turn the temperature back up, and enjoy the warm water again for 3 minutes, followed by another brief period of cold. Repeat this process up to 8 times, remembering to always end your shower on cold. If time does not permit, simply ending your shower on cold will impart significant benefit.
Contrast showers following resistance training are also an effective way to reduce fatigue and delayed onset muscle soreness.
To summarize contrast showers:
3 minutes hot, alternating with 30 seconds cold, always ending on cold.
Ending on cold has a warming effect on the body, as blood vessels are first constricted, then dilated as the body warms itself.
Please do not practice contrast showers if you are pregnant, have cancer, suffer from cardiac insufficiency, or have diminished peripheral sensation (often associated with diabetes or vascular insufficiency.)
Have a great day,
Dr. Kaleigh Anstett
Vancouver Naturopath
Related Articles:
Heat Versus Ice
Neck pain or related upper-limb pain can be very disabling for active patients, young and old. The broad differential includes such conditions as strain, sprain, disk injury, radiculopathy, carpal tunnel syndrome, ulnar neuropathy, and degenerative shoulder disease. Approxiamtely 70% of diagnosis’ can be made solely based on history and physical exam findings. It is essential to determine whether the pain is localized or radiating. Localized neck pain generally points to muscle strains, ligament sprains, and degenerative facet or disk processes. Pain that radiates into the upper limbs frequently stems from nerve involvement. Unless significant trauma has occurred, diagnostic images are not warranted unless they are likely to change treatment.
The typical active person takes neck movements for granted until pain limits activity. Fitness clubs and physical therapy facilities are filled with people striving to develop an increased strength and/or flexibility in their upper and lower limbs, as well as in the abdomen. Often the neck is frequently neglected when it comes to preventing and rehabilitating injuries.
The cervical spine is one of the key links in the kinetic chain of physical motion. It controls head movement and, therefore, a person’s ability to direct his or her organs of sensation. When bone, muscles, or nerves of the neck region are damaged, activities ranging from sedentary to record-setting are disrupted. The chiropractor, therefore, must have a rational approach to diagnosing patients’ common neck and associated upper-limb syndromes so that appropriate treatment can be initiated.
Muscle strains usually resolve within a few days to a couple of weeks, ligament sprains may take up to a couple of months, and disk injuries or herniations with radiculopathy can take up to 6 months for full recovery. Chronic pain beyond 6 months is likely associated with a degenerative process; the intervertebral disk, bone, or ligament, or from subtle mechanical instability caused by faulty posture or biomechanics.
Pain that increases with activity or within a few hours after activity, but settles down with rest or a change in position is commonly referred to as mechanical pain. Pain that persists or worsens despite rest and treatment, pain that persists around the clock, or pain that worsens at night raises suspicion for a metabolic or neoplastic condition or for psychosocial factors that prolong recovery. It’s important, therefore, to inquire about recent fevers, weight loss, or history of carcinoma; the resulting information might suggest the expeditious use of appropriate lab tests and imaging. Questions about recent personal stresses, worker’s compensation, or third-party liability cases may also provide useful information.
Location. It is essential to determine whether the pain is localized or radiating; therefore, knowledge of the anatomic region is essential. Localized pain generally points to muscle strains, ligament sprains, and facet or disk (degenerative) processes, although these structures commonly radiate pain to the periscapular or upper trapezius area as well (5,6). Pain that radiates into the upper limbs frequently stems from nerve involvement, although myofascial pain radiation patterns occur occasionally.
C-Spine Anatomy
The cervical spine is made up of seven vertebrae. C-1 articulates with the occiput of the skull above and with C-2 below. The atlanto-occipital joint primarily allows flexion and extension, while the atlanto-axial articulation primarily provides rotation. Vertebrae C-3 through C-7 allow for varying degrees of flexion, extension, lateral bending, and rotation. Flexion centers on C-5 and C-6 and extension on C-6 and C-7, which is why degenerative changes and spine injuries most commonly occur at these levels.
Intervertebral disks are found from C2-3 and below and are subjected to significant deformation during flexion and extension. Disk degeneration may be painful in its own right, while herniation can lead to compression of the nerve root (radiculopathy) or spinal cord (myelopathy.) Eight pairs of cervical spinal nerves exit bilaterally through the intervertebral foramina. Each spinal nerve is named for the vertebra above which it exits; for example, the C-6 nerve exits above the C-6 vertebra. Therefore, a herniated disk or significant foraminal narrowing at the C5-6 level will most commonly involve the C-6 nerve. The exception is the C-8 spinal nerve, which exits between the C-7 and T-1 vertebrae.
The posterior aspect of the cervical vertebral articulation contains the facet joints, which are true synovial joints, while a bony lip off the lateral margin of the upper vertebral body forms the uncovertebral joint with the vertebra below. Both joints are subject to degenerative changes that may produce pain with cervical extension combined with lateral bending and rotation. Hypertrophy of these joints may affect the surrounding anatomic structures, including the spinal cord, nerve roots, and exiting spinal nerves, as well as the vertebral artery and the sympathetic rami.
The muscles of the neck are divided into four major compartments: anterior (flexion), posterior (extension), and the lateral groups (lateral bending). The posterior muscles are the strongest group and most likely to be the source of pain in conditions resulting from poor posture, in which these muscles are chronically contracting to hold the head upright. The weaker anterior and lateral muscles are involved more in whiplash type injuries in which they stretch suddenly.
Upper cervical nerve injuries are relatively rare and refer dysesthetic pain to the head (C-1, C-2), the neck (C-3), and the upper trapezius region (C-4). The C-5 nerve transmits pain to the shoulder and lateral arm, and occasionally the radial forearm. The C-6 nerve pattern is very similar but invariably includes the radial forearm and thumb, and occasionally the index finger. The C-7 nerve refers pain to the posterior arm, dorsal (occasionally ventral) forearm, and the index and middle fingers. The C-8 nerve classically radiates pain to the medial arm, ulnar forearm, and the ring and little fingers.
Additionally, evidence indicates that the lower cervical nerve roots, disks, spinal longitudinal ligaments (5), and facet joints (6) refer pain to the scapular region. Along with myofascial pain trigger points or biomechanically induced muscle strains, these structures are the common origins of scapular and periscapular pain.
Other differential diagnostic considerations for referred pain include thoracic outlet syndrome and ulnar neuropathy, in which pain refers to the medial arm, forearm, and ring and little fingers, similar to a C-8 radiculopathy. Thoracic outlet syndrome typically will involve more proximal pain as well, such as in the axilla or scapula. Carpal tunnel syndrome characteristically causes dysesthesias in the thumb and first two fingers, and sometimes pain up the arm as high as the neck, thereby mimicking a C-6 or C-7 radiculopathy. Shoulder degenerative joint disease or acromioclavicular, subacromial, or rotator-cuff pathology may be confused with a C-5 radiculopathy.
Reflex sympathetic dystrophy is frequently associated with fractures or even minor trauma to the upper extremity. Pain from brachial plexus injuries or neuritis radiates to multiple dermatomes and myotomes in the arm and forearm, although patients characteristically have little neck pain. Finally, with the increasing incidence of cumulative trauma disorders related to the workplace, many “weekend warriors” complain of vague symptoms in their neck and upper extremities that they attribute to their sport but that actually result from overuse the other 5 days a week.
Characteristics. The quality or intensity of the pain may give clues to its origin. A muscle, ligament, or disk may give rise to sharp pain acutely, and more of a dull, aching sensation in the sub acute or chronic period. Pain of bone and joint origin may refer through the sensory portion of the motor nerves (sclerotome), and is described as a deep or boring pain. Electrical, numbing, tingling, or shooting sensations generally describe neurogenic pain, while throbbing sensations have been attributed to vascular causes.
In an acute injury, muscle guarding can occur as a protective mechanism, however, its long-term presence is usually the sign of a deeper pain generator (disk, bone, nerve root irritation.) The “spasm” is the muscle’s attempt to stabilize the neck and prevent painful motion.
Aggravating and alleviating factors. Finally, asking about aggravating and alleviating factors can further define the pain generator. Combinations of flexion, extension, or lateral bending with rotation that cause localized neck pain may point to muscle, ligament, discogenic, and/or degenerative bone pain. Pain primarily with neck extension is frequently due to compression of the posterior elements, including the facet joints. If pain radiates into the upper limb, a nerve root is usually involved. In an athlete age 50 or older, foraminal stenosis is common; in the younger athlete a discogenic source is more likely. Relief of symptoms with cervical traction generally points to a discogenic or disk-space-narrowing process.
Recumbency usually alleviates mechanical pain, although nocturnal pain with dysesthesias in the arms or hands raises suspicion for thoracic outlet syndrome, carpal tunnel syndrome, or shoulder impingement. Morning pain and stiffness is often seen with osteoarthritis. Pain with overhead activities that radiates into the upper extremities may stem from thoracic outlet syndrome or shoulder impingement. Pain toward the end of the activity or end of the day is associated more with a degenerative process or chronic overuse syndrome. Relief usually comes from rest and preventative chiropractic care.
References for Neck Pain and Injuries
Have a great day,
Dr. Crysta Serné
Vancouver Chiropractor and owner of Vitality Clinic
Related Articles:
Care of Head, Neck, and Upper Back
Rehabilitation Neck Injuries
Upper Body Stretches
Stretches for Nursing Moms (or anyone else with stiff upper Back)
Mouse Placement
Sleeping Positions to Alleviate Neck Pain
Correcting Faulty Posture
Pillow Talk
Are you aware our resident Registered Acupuncturist, Julianne, offers laser therapy treatments? Laser light is a great way to enhance any treatment. Research demonstrates laser affects the mitochondria (the cell’s power house) thereby enhancing the production and synthesis of ATP (the cell’s energy.) This allows the body to optimize healing and growth. It does so by “injecting” billions of photons of visible and/or invisible laser light deep into tissue structures. This chemical energy is utilized by the tissue to significantly accelerate the healing process and reduce pain in the body naturally.
Laser therapy can assist with:
age spots,
acne,
skin ulceration,
soft-tissue damage,
sports injuries (sprains, strains, and contusions), and
arthritis pain.
The healing process increases the strength of healed tissue, reduces swelling, increases blood flow, increases lymphatic activity; reduces inflammation, and increases cellular metabolism which speeds up the repair process. The results are accumulative.
Call the clinic to book your treatment today!
Have a great day,
Dr. Crysta Serné
Vancouver Chiropractor and owner of Vitality Clinic
Overview
Your feet are a complex system of 52 bones, 66 joints, 214 ligaments and 38 tendons and muscles, containing 25% of all the bones in your body. In your lifetime your feet will take over 100 million steps, with every step an impact on your body. Abnormal stresses and structural problems in your feet can cause pain throughout your entire body. Whatever the source of your pain – consider the possibility that custom prescribed foot orthotics can help. This is a service the clinic Chiropractors offers in house.
Orthotics are orthopedic devices designed to treat or adjust various biomechanical foot disorders. They may be simple, commercially made devices, such as cushioned heel cups or insoles for shoes. These are sold over-the-counter in drug stores or other retail establishments. The best orthotics, however, are custom-tailored devices specifically crafted to meet the needs of a particular individual. This is done by making an impression of the foot called a cast. The impressions in the cast duplicate any misalignments in the foot. Specialists in an orthotic laboratory can then correct the misalignments with compensation and stabilization techniques. The finished orthotic is then placed in the patient’s shoe and helps keep the foot in proper alignment. Depending upon the patient’s needs, the orthotic may have padding to cushion the foot against the weight of the body.
Types of Orthotics
In general, orthotics are grouped into four broad categories.
• Functional orthotics incorporate special wedges to adjust the heel or forefoot, correcting defects in the arch causing poor shock absorption, such as excessive pronation (collapsed arch) or supination (an arch that is too high).
• Weight-dispersive or accommodative orthotics typically feature padding designed to relieve pain caused by excessive pressure on the metatarsal heads. Other accommodative orthotics are designed to treat pain and pressure on the sesamoid bones, collapsed tarsal bones, sores, and chronically inflamed toes.
• Supportive orthotics are arch supports usually prescribed to treat problems of the plantar arch.
• Early childhood orthotics are special devices designed to correct biomechanical walking problems identified in young children. They include splints, gait plates and night bars – devices used to hold a child’s feet and legs at a proper angle while sleeping, thus promoting corrective adjustment for excessive toe-in or toe-out walking.
Will Orthotics help me?
Because perfect feet are very rare, almost anyone can benefit from orthotics. They can prevent and alleviate many of the common foot complications that cause discomfort in otherwise healthy people. An analogy can be made between orthotics and eyeglasses. Both adjust bodily imperfections that inhibit people from functioning at their maximum physical potential. In both cases, a specially trained Practitioner will do a complete examination and prescribe the proper amount of correction.
Almost anyone can achieve some benefit from an orthotic. There are several common symptoms that may indicate misalignment of the feet. You may be a candidate for orthotics if:
• one side of the sole of your shoe wears out faster than the other;
• you frequently sprain your ankle;
• you have chronic heel, knee or lower back pain;
• your shins hurt;
• your toes are not straight;
• your feet point inward or excessively outward when you walk; or
• your feet hurt in general.
Your feet should not hurt; pain is the body’s way of warning you something is wrong. If you ignore your pain, the condition causing it could become worse. Relief is closer than you think. If you answered yes to any of the above conditions you should be aware that faulty mechanics in the bones of the feet or pelvis may be the cause. Treat the cause & the pain goes away. Treat the symptom and it will just keep coming back.
Indications for Orthotics:
Improper Biomechanics
Plantar Fasciitis
Stress Fracture
Poor Shock Absorption
Sports Performance
Uneven Leg Length (Short Leg Syndrome)
Matatarsalgia
Morton’s Neuroma
Arthritis
Diabetes
Heel Spurs
Bunions
How Does an Orthotic Work?
To explain how orthotics function, it is important to understand the mechanics of walking. Each step, the vertical axis of the heel ideally should land almost perpendicular to the ground, with a slight inclination of only a few degrees toward the outside of the heel. From there, the weight is distributed progressively toward the lateral (outside) side of the foot. As the little (or fifth) toe starts to touch the ground, the arch of the foot should flatten slightly, shifting the body’s weight toward the medial (inside) side of the foot. The heel then should start to lift off the ground, shifting the weight to the medial forefoot, principally the ball of the foot and the first.
This coordinated motion occurs in much less time that it takes to describe. It is, nevertheless, a complex process in which many things can go wrong. If a structural problem is present, the foot can collapse under the body’s weight. Runners in particular exert much greater forces on their feet than those generated by simple walking. This can lead to more severe injuries, such as sprained ankles, shin splints and even fractures.
Over time, stresses on the feet can deform them. One of the foot’s main functions is to absorb shock as the body’s weight shifts with each step. It does this through a complex process in which the arch of the foot flattens slightly. This absorbs and distributes the weight throughout the entire foot. There are two major problems that can occur in this mechanism.
The first occurs when the arch does not flatten at all. This typically occurs in a person with a high arch, called a cavus foot. It absorbs shock poorly because the arch does not flatten,. Instead of spreading it throughout the entire foot, the weight of the body falls only on the heel and the bases of the toes. This increases stress on the foot, especially the heel. Furthermore, because the weight is not absorbed well in the foot, it radiates up the leg to other joints. Over time, this can cause pain in the knees, hips and lower back.
To correct this condition, an orthotic is used to bring the ground into even contact with the rest of the foot. This allows the entire foot to support the weight of the body. Extra cushioning can be built into the orthotic so that some of the force does not even reach the foot.
A different problem results if the arch flattens too much. This is known as pes planus or flat foot. In such cases, the weight distribution on the foot is too far on the medial side. A flat foot is unstable and cannot maintain a proper arch. Over time, the weight of the body on an unstable foot will cause the bones of the foot to become misaligned. This can lead to the development bunions, hammer toes and other foot deformities, as well as knee and lower back pain.
To address this problem, an orthotic with an increased arch will be prescribed to distribute the weight laterally. Depending on shape of the foot, the heel of the orthotic can be slanted to shift the weight more toward the center of the heel.
How Is an Orthotic Made?
While orthotics can be made by several different processes, I prefer to make a biofoam cast of the patient’s foot. This is called a negative impression. The cast is sent to a laboratory with a prescription for recommended modifications. At the lab, a positive cast is made by pouring plaster into the negative cast. When this dries, it forms a perfect reproduction of the bottom of the foot. Using the chiropractor’s recommendations for corrections, the lab technicians custom-mold an orthotic that incorporates the necessary adjustments. This will provide the patient with the support, stability, cushioning and alignment necessary to keep his or her ankles and lower body comfortable, healthy and pain-free.
Have a great day,
Dr. Crysta Serné
Vancouver Chiropractor and owner of Vitality Clinic
When you go out to play golf you’re hoping for a good round. I know I do. How often does your outcome match what you hoped for? Do you usually shoot the scores you had envisioned before you teed off? If not, do you ever evaluate where and how you could have saved strokes and avoided those blow up holes?
Here are 5 easy tips for you to implement immediately that will shave 4-6, or even more strokes off your score the next time you play.
First, you’ve got to put the proper fuel in your body before you leave home. Most golfers don’t give it a second thought. They either don’t eat at all before they leave home or they eat something that is not going to give them the long-term energy they’re hoping for. Whether it’s lunch or breakfast before you leave, you need to consume a complex carbohydrate and a good protein source. This combination will warrant the best use of your energy for the entire round.
• An example for breakfast would be a bowl of quinoa or oatmeal, an egg, and a piece of fruit or a glass of juice. A suggestion for lunch would be a turkey sandwich on whole grain bread with a piece of fruit. Ensure there is a variety of vegetables on the sandwich and avoid mayonnaise or butter. Consider adding hummus as an alternative.
The second tip is to properly warm up your body before you hit your first ball. So many golfers show up 5 minutes before tee time, take a few putts, and then head to the first tee. Those golfers are potentially headed for a double bogey right off the bat… A better approach is to give yourself at least 30 minutes before your tee time. First, do some dynamic (movement oriented) stretches to prepare your body to perform. Exercises such as arm circles, partial squats, toe touches, etc. Next, take some half swings with a 7 iron. Now you’re ready to hit some wedges. With this approach, your hits on the range will be much better, which will build your confidence.
Drink lots of water even before you leave your house. However, only drink a maximum of 500ml of water per hour. Anything more than that and you’re quenching your thirst but not hydrating your tissues. Dehydration causes energy loss, lack of focus and concentration, fatigue, and possibly muscle cramps later in the round. Also, remember to bring a water bottle with you so you can continue to drink water during your round.
Don’t wait until you feel tension to initiate stretching. Constantly move your body and stretch your joints while you play. I often see and hear golfers complaining of tight lower backs or shoulders during the round, and especially after when they are in for an appointment. Think of your body as a machine; if the machine starts to break down – fix it. You’ll see a big difference in your swing mechanics late in the round.
Snack while you play. I don’t mean the hot dog at the turn with a beer chaser! Bring fruit, nuts, and nutrition bars to eat every 4-6 holes. When you supply your body with the proper nutrients, your energy levels stay balanced and you will avoid those mental lapses later in the round. How many times have you had a good score only to blow up late in the round? I’ll bet more than a couple of times; I know I have.
Now some of these tips you may have been aware of, and maybe a couple of them you haven’t given as much thought to. Do all of them and your score will show it. The above routine should become part of your golf experience every time you go out and play. This is called pre-game preparation and performance maintenance. You’re an athlete (believe it or not) so treat you body like one!
Have a great round,
Dr. Crysta Serné
Vancouver Chiropractor and owner of Vitality Clinic
Intramuscular stimulation, or IMS has become a popular method of relieving chronic and acute muscle pain and spasticity. IMS is extremely useful in treating skeletal muscle trigger points, or areas of shorted, contracted skeletal muscle that contribute to pain and dysfunction. Acupuncture needles, as opposed to much larger needles typically used for injections, are inserted directly into trigger points. This direct stimulation of the trigger point often precipitates fasciculation or muscle spasm, and relaxation of the affected muscle, leading to pain relief.
Specifically, IMS is used to treat neuropathic pain, resulting from skeletal muscle “supersensitivity”. According to Dr. Chann Gunn, a pioneer in the method of IMS and pain pathophysiology, supersensitivity is the process by which nerves become over sensitive to stimuli causing an increased perception of pain. “Super sensitive” muscles cannot be seen via medical imaging, and may only be identified via a combination of palpation, and patient history. Some deep muscles that aren’t easily palpated must be assessed via the insertion of acupuncture or IMS needles. If the suspected muscle is not functioning appropriately and contains trigger points, the patient will feel an odd, deep aching sensation. If the muscle is healthy and contracting appropriately, this deep aching sensation will not be experienced.
Once a trigger point has been identified and needled appropriately, the affected muscle will either start to spasm immediately, or tightly grasp the needle for a period of time. This “grabbing” sensation is a result of muscle stimulation and is transient, but is often perceived as a deep intense muscle ache that may radiate to bony attachments. As the trigger point begins to relax, the deep aching sensation subsides. If a muscle contains many trigger points, multiple treatments are often necessary – typically patients see complete relief with 8-10 sessions, but often benefit greatly after a single treatment.
Historically, the needling of muscular trigger points has contributed greatly to the treatment of pain and muscle dysfunction in traditional Chinese medicine. Traditional acupuncturists directly needle what are known at “ashi” points, or points of muscle tenderness and pain, with predictable referral patterns. Traditional acupuncturists will also typically needle additional points with therapeutic properties based on the patient’s presenting concerns and systemic health pattern.
Therapeutic IMS is an incredibly effective adjunct to chiropractic care and massage therapy, and is currently offered at Vitality Clinic.
Have a great day,
Dr. Kaleigh Anstett, ND
It is generally accepted increasing the flexibility of our muscles promotes better performance and decreases injuries. Stretching is regularly included in both warm-up and cool down, with the notion that decreased muscle stiffness allows for increased joint range of motion. However, a number of recent research studies, using athletes in several sports, suggest that pre-event static stretching may actually negatively impact the performance of maximal muscle strength, power and even balance and reaction time. This means static stretching as part of a warm-up leads to greater potential for injury occurring during an event.
The scientific basis of stretching is that it increases the compliance of the muscle tissue for a short period of time. Unfortunately, increased compliance decreases the ability of the tissue to absorb energy and can potentially increase the chance of injury.
The most important aspect of the pre-match preparation should be on active warm-up and sport-specific movements. The goal of a warm-up is to gradually increase the metabolic demands required for running. By doing a progressive warm-up, muscle temperature and blood circulation will increase. More blood flow (and nutrients and oxygen which fuel exercise) to the working muscles helps prevent metabolic by-products such as lactic acid. Improved core temperature allows for increased elasticity of the soft tissue structures improving flexibility and range of motion. Nerve impulses also travel faster at higher temperatures preparing the muscles for increased speed of contraction.
For a runner, this means using movements that target the muscles used in running and taking those muscles through an active range of motion to prepare them for work. These movements will closely resemble what will take place during your actual training.
The following are a few dynamic stretches that can be used as part of your warm up:
1. High Steps Actively warms up the hip flexors and calves while passively stretching the hamstrings, glutes and low back (extensor chain). Begin by stepping forward. As you step forward, bring your knee to your chest – pull it into the chest with your hands. Next step, opposite knee. While doing this move, try to push up on to your toes – as you pull your knee into your chest. Walk yourself forward 15-20 feet/return to starting point.
2. Frankenstein March Actively warms up the hip flexors while passively stretching the hamstrings, glutes and low back (extensor chain). Begin by standing with your arms extended out in front of you. Swing your right leg forward and touch your left hand and return the leg and hand back to starting position and repeat on opposite side – kind of like a skipping motion While performing this move, try to avoid bending forward as you lift your leg and keep your leg soft (not totally straight) while lifting to your hand. Move forward 15 to 20 feet while performing this movement at a moderate pace/ repeat back to the starting point.
3. Back Pedal Simply run backwards over the 15 to 20 feet while over-exaggerating your stride. This helps warm up the extensor chain. Pace is slightly faster than moderate for this movement.
4. Fifty-Percent Sprint/Stride Sprint at 50 percent of your max speed for 15 to 20 feet, moving forward with a slight over-stride. These are just a few, but by adding these exercises to your warm up routine you can help reduce the likelihood of injury.
Static stretching is still fine – AFTER your event. Increasing your flexibility of your muscles is still desired; it’s just the timing of that static stretching. Remember dynamic before, static after!
So if you are in the Vancouver area and would like an individualized warm up program to suit your needs, please make an appointment with either our Chiropractors or Registered Massage Therapists.
Good luck with your runs.
The Vitality Clinic Team
]]>Prairie dog, aka bird dog, is another great core strengthening exercise. It is considered a unilateral, isometric stabilizing exercise as it predominately uses one side of the body at time (unilateral) and the muscle neither lengthens nor shortens (isometric.). Ensure you have a flat back when you go into your 4 point stance- that it, you are not arching or rounding your low back, and humping or collapsing between your shoulder blades.
Start by extending the leg out behind you and ensure your knee point directly towards the floor. Once you have complete control of this position, initiate bringing the opposite arm out in front of you. Do not let the extended leg rotate towards the sky and ensure your weight is evenly distributed between the knee and the hand still on the ground.
The key to having the prairie dog work the appropriate muscles to their maximal efficiency is dependent on hip to knee positioning. When you are in the position, ensure your knee is directly underneath the hip (as opposed to the hip being positioned closer to the shoulders.) This disperses the weight from the shoulder and forearm muscles and redirects it towards the abdominals and deep muscles of the lower back. Also, the foot that remains on the ground should be flat as opposed to curling your toes under.
This is an exercise geared towards increasing the endurance of the muscle so it should be performed until failure- that is until you can no longer hold the correct technique. Rest 10 seconds and repeat up to 5 times. Repeat on the other side.
If you currently have low back pain or experience it when performing this exercise, please discontinue the exercise and consult your health care practitioner. Vitality Clinic and Dr. Serné assumes no responsibility.
Have a great day,
Dr. Crysta Serné
Vancouver Chiropractor and owner of Vitality Clinic
The plank or elbow hold is a fantastic core exercise. It is considered a bilateral, isometric stabilizing exercise as it uses both sides of the body at the same time (bilateral) and the muscle neither lengthens nor shortens (isometric.) Ensure you maintain your pelvic tilt so you do not raise your buttocks into the air and create a “jackknife” position.
The key to having the plank work the appropriate muscles to their maximal efficiency is dependent on shoulder to elbow positioning. When you are in the position, ensure your shoulders are rocked towards your feet so they are positioned just behind the elbow (as opposed to directly underneath.) This disperses the weight from the shoulder muscles and redirects it towards the latissimus, abdominals, and deep muscles of the lower back.
This is an exercise geared towards increasing the endurance of the muscle so it should be performed until failure- that is until you can no longer hold the correct technique. Rest 10 seconds and repeat up to 5 times.
If you currently have low back pain or experience it when performing this exercise, please discontinue the exercise and consult your health care practitioner. Vitality Clinic and Dr. Serné assume no responsibility.
Have a great day,
Dr. Crysta Serné
Vancouver Chiropractor and owner of Vitality Clinic
People who suffer from lower back pain are often encouraged to participate in their own recovery, but they are seldom given the knowledge and tools needed to accomplish this. This discussion will help you acquire a basic understanding of the reasons for lower back pain, and take charge of your own health by taking the appropriate steps to rehabilitate your back.
Of course, getting better is only the beginning, since further episodes of back pain are quite common as time passes. Fortunately, you can improve your chances of avoiding recurrences by rehabilitating your back, whether you are experiencing your first bout with low back pain or have had extensive treatments or even surgery.
Causes of back pain
There are several structures in the back that can cause and/or contribute to low back pain. Although the intervertebral disc is a remarkably versatile and strong structure, essentially acting as a shock absorber as we go about our activities, sometimes the disc fails over time due to repetitive compressive forces, or when there is a sudden, unexpected force (such as a fall, lifting or other trauma). Unfortunately, when the disc does get injured it cannot repair itself very well, which is one of the major reasons recurrent back pain is so common.
Making matters worse, the pain often prevents us from getting enough exercise, which adversely affects disc nutrition. Nutrition for the disc is achieved when physical activities cause the disc to swell up with water and then squeeze it out – much like a sponge. When pain affects our physical activity, the injured disc is deprived of its nutrition and begins to degenerate.
Activity is also needed to maintain the exchange of fluids in spinal structures and reduce swelling that naturally occurs in the tissues surrounding an injured disc. This swelling can further irritate nerves that are already affected by herniated disc material.
The muscles, ligaments and tendons in the back are also very important in maintaining proper spinal balance and strength. With decreased activity, the connective fibres of ligaments and tendons can begin to adhere to each other, lose resilience and may tear when sudden overload occurs. Unlike discs or connective tissue, however, when muscles are injured they can quickly repair themselves.
However, muscles contribute to chronic back pain. When nerves are damaged or pinched, the muscles they control may not work as efficiently, as sometimes happens when a herniated disc presses on a nerve. Also, since muscles are in constant communication with the central nervous system, anger or anxiety can tense the muscles and cause muscle spasms. Ongoing tension inhibits normal muscle function and leads to muscle wasting and further stability problems, which in turn can lead to chronic lower back pain.
Acute vs. chronic back pain
It’s important to note that acute pain is different from chronic pain. We have all experienced acute pain from a sudden soft tissue injury, such as a sprained ankle, or even just a simple paper cut. The pain is immediate, but gradually resolves as the injured part heals.
Unlike acute pain, chronic pain comprises a constant low level of stimulation to the nervous system that eventually becomes a pattern. It may even persist as a “neural memory” after the initial source of irritation has resolved. The adaptation of our nervous system to this chronic stimulation creates an environment in which events that previously caused no pain become a source of pain. Pain may even progress to uninjured areas.
Emotional distress and certain medications can exacerbate this phenomenon. An effective solution is to distract the nervous system by means of active exercise in a controlled, non-destructive manner. Chiropractic adjustments aid in the body’s ability to regulate the neural feedback much like a dimmer switch can control light. This also helps to create the physiological conditions that allow the injured structures to heal.
Rehabilitation exercises
One of the keys to recovering from an episode of back pain and to help avoid future recurrences of back pain, is to undergo proper rehabilitation in terms of stretching, core strengthening, and aerobic conditioning of the back and body. This requires a basic understanding of the types of muscles that need to be conditioned.
There are three types of muscles that support the spine:
• Extensors (back and gluteal muscles): used to straighten the back (stand), lift and extend, and move the thighs out away from the body.
• Flexors (abdominal and iliopsoas muscles): used to bend and support the spine from the front, they also control the arch of the lumbar (lower) spine and flex and move the thigh in toward the body.
• Obliques or Rotators (side muscles): used to stabilize the spine when upright, they rotate the spine and help maintain proper posture and spinal curvature.
While some of these muscles are used in everyday life, most do not get adequate exercise from daily activities and tend to weaken with age unless they are specifically exercised.
For all forms of exercise, it is advisable to see a trained and licensed chiropractor as they are the experts when it comes to your back. Depending on your specific diagnosis and level of pain, the rehabilitation program will be very different, and we are trained to develop an appropriate rehabilitation program and provide instruction on correct form and technique.
Stretching
Any form of inactivity, especially where an injured back is involved, is usually associated with some progressive stiffness. Therefore, it is necessary to push the range of motion as far as can be tolerated (in a controlled manner). Patients with chronic pain may find it takes weeks or months of stretching to mobilize the spine and soft tissues, but will find that the increase in motion provides meaningful and sustained relief of their back pain.
Stretching exercises should focus on achieving flexibility and elasticity in the disc, muscles, ligaments, and tendons. Additionally, it is important to activate and strengthen muscles not directly involved with the injured area, such as the arms and legs. For example, the hamstring muscles play a role in lower back pain, as it is clear that hamstring tightness limits motion in the pelvis and can place it in a position that increases stress across the low back.
Stretching is one of the most under-utilized techniques for improving athletic performance, preventing sports injury and properly rehabilitating sprain and strain injury. Don’t make the mistake of thinking that something as simple as stretching won’t be effective. However, be cautious as you can also over stretch a muscle!
Strengthening
Re-injury is less likely to occur if core strengthening is included in your treatment plan than if mere pain relief is achieved with just stretching. An episode of back pain that lasts for more than 72 hours should be addressed with your Chiropractor, treated to aid in mobility restoration and pain management, and then proper strengthening exercises to prevent a recurring cycle of pain and weakness.
There are two primary forms of exercise for strengthening and/or pain relief that tend to be used for specific conditions. When appropriate, the two forms of physical therapy may also be combined.
McKenzie exercises, in general focuses on extending the spine to reduce pain generated from the disc space. Theoretically, extension may also help reduce a herniated disc and reduce pressure on a nerve root. For patients who are suffering from leg pain due to a herniated disc (e.g. sciatica), extending the spine may help reduce the leg pain by “centralizing” the pain (moving the pain from the leg to the lower back). For most people, back pain is usually more tolerable than leg pain. Sometimes, based on the structured evaluation, flexion exercises are appropriate.
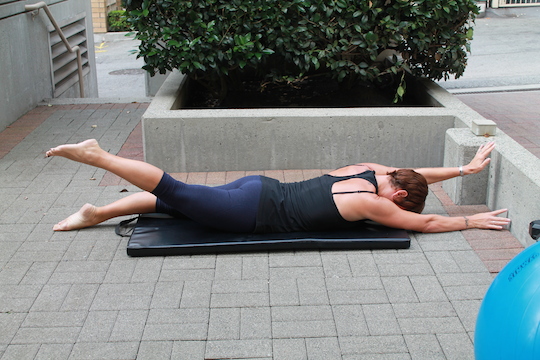
Lumbar stabilization exercises focus on finding the patient’s “neutral” spine, or the position that allows the patient to feel most comfortable. The back muscles are then exercised to teach the spine how to stay in this position. Performed on an ongoing basis, these exercises can help keep the back strong and well positioned. Special attention is paid to the extensor muscles of the lower back with resistance exercises.
Additionally, a strengthening program that involves progressive loading and unloading of the lumbar spine by means of flexion/extension exercises can reduce pain and increase the perception of improved back strength. This training, called facilitation, is best accomplished when the muscles to be facilitated are isolated in some way so that other muscles cannot take over the job. Often specific equipment is required to achieve that goal.
Low-impact aerobic conditioning
Finally, conditioning through low-impact aerobic exercise is very important for both rehabilitation and maintenance of the lower back. Aerobically fit patients will have fewer episodes of low back pain, and will experience less pain when an episode occurs. Well-conditioned patients are also more likely to maintain their regular routine, whereas patients with chronic low back pain who do not work on aerobic conditioning are likely to gradually lose their ability to perform everyday activities.
Examples of low impact aerobic exercises that many people with back pain can tolerate include:
Stationary biking. Riding a stationary bicycle provides aerobic conditioning with minimal impact on the spine. This is also a good exercise option for people who are more comfortable positioned leaning forward.
Walking. Many people think that walking as part of their daily routine (e.g. at work or while shopping) is enough. However, this stop-and-start type of walking is not adequate for aerobic conditioning. Instead, continuous walking at a sustained pace for a minimum of twenty to thirty minutes is required to provide aerobic conditioning.
Water therapy (also called pool therapy or hydrotherapy). For people with a great deal of pain, water therapy provides a gentle form of conditioning as the water alleviates gravity and provides buoyancy as well as mild resistance.
Depending on your injury and exercise preferences, you may prefer a different form of exercise. It may be helpful to discuss your options with your chiropractor or physical therapist to identify an appropriate form of aerobic exercise for you and incorporate it into your exercise routine.
Guidelines for successful recovery
In addition to chiropractic care, stretching, strengthening, and aerobic exercises, there are several basic guidelines that can help you in your healing and rehabilitation process. These guidelines include:
Manage anxiety
Controlling anxiety and fear of re-injury is very important to regain normal muscle function. The basis for these psychological reactions to low back pain lies in the central nervous system, which responds to pain by instructing the muscles near the affected part to protect against further injury. Only appropriate physical training that specifically tells the muscles to improve their function can overcome this neurological barrier to normal muscle function.
Eat properly
The healing process can be aided with appropriate nutrition, which includes adequate calorie intake in a balanced manner. If all calories consumed are in the form of sugars (such as breads, pasta, and sweets), any calories not immediately needed for energy are converted into fat. You don’t need extra weight while you are in the healing process. Your diet should include adequate protein as a source of the building blocks of soft tissue healing. Additionally, fresh fruit and vegetables supply the vitamins and trace elements necessary for effective healing. A vitamin supplement may also be helpful.
Get adequate sleep
One of the best ways to encourage sleep is to induce physical weariness through active exercise. Chronic inactivity does not create a need for the deep sleep that is so helpful for physical and emotional healing. Clearly, stimulants such as caffeine or nicotine should be avoided at bedtime. Smoking should also be avoided because it diminishes the available blood supply and makes the nervous system more sensitive.
Control medication use
While medications are often important for pain relief, one should also be careful about the use of medications. Dr. Serné recommends natural forms of anti-inflammatories, muscle relaxants, and other tissue healing alternatives. The use of heat or cold, or liniment or massage, as a mechanism for pain control is a very safe and positive alternative for pain management.
Exercise properly
Exercise in a controlled, gradual, and progressive manner is the only way we can tell our body to heal. Injections and medications can provide pain relief but cannot stimulate the healing process. If a pain problem has persisted for many weeks, the body is demonstrating that there are barriers to the healing process that need to be eliminated. The natural stimulus for the healing process is active exercise. Active exercise means we use our nervous system to tell the muscles what to do, and includes dedication to an appropriate, comprehensive exercise and rehabilitation program.
Finally, an important guideline is to seek the assistance of an appropriately trained and licensed health professional for your rehabilitation. Likewise, it’s always important to see the Chiropractor if your lower back pain lasts for more than a few days or if you have any symptoms that cause you concern, as the continued pain and/or symptoms may signify a serious medical condition.
Ultimately, participating in developing and maintaining an active rehabilitation program for back pain should help you heal faster and have fewer recurrences of pain.
Have a great weekend,
Dr. Crysta Serné
Vancouver Chiropractor and owner of Vitality Clinic
Many individuals develop imbalance and pain as a result of a leg-length discrepancy. If one leg is longer, it is similar to driving around with one car tire slightly larger than the others. The center of gravity changes as weight is transferred to one side of the body. Often, one shoe heel will wear away faster than the other. Due to improper weight distribution and stresses placed upon then, one side of the posterior chain (foot, ankle, knee, and hip) will be undergo compensatory changes. Scoliosis develops with eventual premature joint degeneration on one side of the spine and wight bearing joints. The short-leg syndrome has been an enemy to athletes, Sports Therapists, and Chiropractors for many years.
Questions such as the following are asked daily: (1) Can it be an aggravation to, or cause of, low back pain in lower extremity problems? (2) Should a heel lift or orthotic be put in the shoe of the long leg or the short leg? (3) Will I always have to run on beveled road shoulder to have even lengths? The first thing that should be considered is that there are two types of short-leg syndrome:
1.Anatomical Short Leg. The measurement from the bony protuberance (the greater trochanter) of the hip joint to the lateral ankle measures shorter on one side than the other. This is seen in approximately three percent of all short-leg syndromes.
2.Functional Short Leg. The measurement from the same two points is equal on both sides, but there is still an apparent short leg. With this type, there is usually a rotation or displacement of the pelvis on one or both sides. This causes abnormal stress on all muscles, nerves, and joints that are involved. The longer a person has this type of short-leg syndrome, the greater the chance for a secondary compensatory problem somewhere else in the body, usually in the upper back, shoulders or neck. Common symptoms include muscular pains in the involved areas, headaches, numbness and/or tingling in the arms or hands.
There is a relatively simple test to determine which short-leg syndrome you may have; it is known as the Deerfield Test. With the individual lying face down, check the length by correcting any pronation or supination of the feet so that the heels are parallel and perpendicular to the plane of the legs. This is easier to visualize with shoes on than with bare feet because the shoe has a flat heel as opposed to the foot’s rounded heel. After noticing which leg is short, flex both knees to 90°. If it is anatomical shortness, the difference in leg length will be identical in positions 1 and 2. If it is a functional shortness, the short leg will either become longer as the other leg or longer when in the flex position. If it is functional shortness, the short leg will be either become as long as the other leg or longer when in the flex position. This is called cross-over. Whichever syndrome one is suffering from, the weight distribution through each leg will be uneven. As a result of the increase in poundage and stress on the body and legs during impact, the symptoms will be more pronounced in someone who is involved in more impact oriented activities, such as long distance running, soccer, rugby, etc.
What symptoms should make a person consider short-leg syndrome?
Any symptom exaggerated by impact, such as low back, hip, knee, ankle, or foot pain. Second, a tendency to repeatedly strain the same muscle even given sufficient time to heal. Shin splints and sciatic neuralgia (inflammation of the sciatic nerve that produces pain in the buttocks and down the back of the leg) are also commonly associated with SLS.
How does a functional leg-length difference develop?
Over a number of years, one side of the spine may develop stronger than the other. Sleeping on one side; carrying items on one side; running clockwise on a track; using the phone on one side; facing traffic when you run; lifting suitcases; carrying kids; acquiring injuries when as a child, or even forceps delivery at birth, for example, can result in functional imbalances. An individual with a large discrepancy in leg length will often notice postural irregularities in photographs of him or herself. One shoulder may be elevated, and the head tilted towards the side of the high shoulder. Your tailor may be the first to notice a leg-length discrepancy. Many runners with leg-length discrepancies report their cadence changes and they feel they impact one side greater than the other. Some runners state that they feel “lopsided” when running and as noted earlier, one heel usually wears away faster than the other.
After it has been determined which syndrome is evident, a correction should be considered. With an anatomical shortness, correction is made simply by placing a heel lift in the shoe of the short leg. The lift can either be inserted in the shoe itself or constructed into an orthotic. This can be done by any of the Chiropractors at Vitality Clinic. When addressing a functional shortness, the first thing to consider is the underlying cause of the short leg. A functional leg-length discrepancy is present in three out of five people and the difference may vary significantly. If the difference is minimal, the patient is often asymptomatic. Over time, however, a minimal difference always becomes greater. With individuals sustaining a greater amount of impact, the change in leg length is more rapid, due to the increased vertical impact. Gravity eventually wins if nothing is done to combat the imbalance.
Some common causes are:
- Arches are not symmetrical in both feet. (correction can be aided with the arch supports or orthotics).
- An abnormal range of motion in the joints. Each joint, including ankle, knee, hip, and low back, should be put through a full range of motion to ensure normal equal motion.
- A weakness of one or more lower extremity muscles, which allows the pelvis to rotate either anteriorly (forward) or posteriorly (backward) in relationship to the other side.
- Bad habits, such as poor posture, slouching in chairs, crossing legs while sitting, standing with all your weight on one leg, always running on the same side of a beveled roads or insufficient stretching.
- Poor quality running shoes.
Correction of functional shortness involves a number of factors.
First, correction of any structural faults has to be made to allow for normal weight distribution and normal functioning of the joints and muscle involved. This is done by correcting any muscular imbalances (right vs. left and front vs. back) that become apparent after a through examination by a Chiropractor. After correction of the muscular imbalances, adjustments of the involved joints is often performed to correct any structural imbalances. This allows all joints to functional under a proportionate weight distribution.
Second, a visual observation of the patient running is often required to determine if there are any abnormalities in the gait or stride (cadence), such as one arm held close to the body in its correct motion.
Third, correction of the short-leg syndrome is made to prevent further stress on the joints. During every Chiropractic patient’s first visit, we examine and determine potential leg-length discrepancies. Within four weeks of treatment, we re-evaluate to determine what changes have occurred.
Spinal and SLS screens are recommended for everyone, but especially school aged children. Corrections made early enough have the potential to last a lifetime.
Be proactive, not reactive when it comes to your health.
Dr. Crysta Serné
Vancouver Chiropractor and owner of Vitality Clinic
Posture is essential to the position of the body in space. Optimal posture is the state of muscular and skeletal balance that protects the supporting structures of the body against injury or progressive deformity, whether at work or at rest. Correct posture involves the positioning of the joints to provide minimum stress on the joints of the body. Conversely, faulty posture increases stress on the joints. This increased stress can be compensated for by strong muscles, but if they are weak or the joints lack mobility or are too mobile, joint wear and modification can occur. As well, damage and changes to the surrounding tissues can occur. Posture can also involve the chain link concept of body mechanics in which problems anywhere along the body chain can lead to problems above or below that point.
For example, knee pain can arise from pelvic joint disorders. Without good posture, your overall health and total efficiency may be compromised. Because the long term effects of poor posture can affect bodily systems (such as digestion, elimination, breathing, muscles, joints, and ligaments), a person who has poor posture may often be tired or unable to work efficiently or move properly. Even for younger people, how you carry yourself when working, relaxing or playing can have big effects.
Did you know that just fifteen minutes reading or typing when using inappropriate biomechanics will exhaust the muscles in your neck, shoulders, and upper back?
Causes of Poor Posture
The causes of poor posture can be divided into two categories: positional and structural. Structural causes are basically permanent anatomical deformities not amenable to correction by conservative treatments.
Positional causes of poor posture include:
• Poor postural habit for whatever reasons the individual does not maintain a correct posture
• Psychological factors, especially self esteem
• Normal developmental and degenerative processes
• Pain leading to muscle guarding and avoidance postures
• Muscle imbalance, spasm, and contracture
• Respiratory conditions
• General weakness
• Excess weight
• Loss of proprioception – the inability to perceive the position of your body in space
Physiology of Posture
Posture control involves static and phasic reflexes. Static reflexes involve sustained contraction of the musculature while dynamic, short term phasic reflexes involve transient movements. Both types of reflex are integrated at various levels in the central nervous system (CNS) from the spinal cord to the cerebral cortex and are largely affected through extrapyramidal motor pathways. Postural reflex patterns from reflexes, such as the stretch and withdrawal reflexes, result in a coordination of many joint movements and combinations of muscle actions. These include contraction of prime movers, synergists, and stabilizers, along with the necessary relaxation of antagonists. These muscles are regulated for contraction intensity, speed, duration, and sequential changes in activity. The integrative pattern of posture is predominantly automatic and unconscious, resulting from the incessant shifting of weight (postural sway.) Postural corrections are continually mediated by the myotatic stretch reflex. Posture is further mediated by the visual, labyrinthine, neck righting reflexes, and by the interplay of joint reflexes. While the control of posture is primarily controlled by various reflex mechanisms, there is also extensive input from the higher centers of the central nervous. Therefore, posture to some extent can be relearned (corrected) just as it was learned in the first place. What does perfect posture look like?
Normal Posture
Perfect standing posture is when the following are properly aligned:
• The points between your eyes, chin, collarbone, and midpoint between your ankles
• From the side, you can easily see the three natural curves in your back
• From the front, your shoulders, hips, and knees are of equal height
• Your head is held straight, not tilted or turned to one side
• From the back, the spinous processes of your spine should be in straight line down the center of your back
Obviously, no one spends all day in this position. But, if you naturally assume a relaxed standing posture, you will carry yourself in a more balanced position and with less stress in your other activities.
Poor Posture
When you have poor posture, the body’s vertical position is out of alignment and the back’s natural curves become distorted. Head forward or slouched posture:
• Rounded shoulders
• Head forward, rounded upper back
• Arched low back
• Protruding buttocks
• Chest flattens
• Abdominal organs sag, crowding and making more work for your heart and lungs
• Seen often in women who have osteoporosis in later years
Military Posture:
• Head pulled back
• Shoulder blades tightly pulled back
• Arched lower back
• Knees locked (hyperextended)
• Minimizes the spinal column’s ability to be a shock absorber for the body
Slumped sitting posture:
• Upper back humped or too rounded
• Head forward
• Rounded lower back
Tests for Postural Faults
The Wall Test- Stand with the back of your hand touching the wall and your heels six inches from the baseboard. With your buttocks touching the wall, check the distance with your hand between your lower back and the wall, and your neck and the wall. If you can get within an inch or two at the low back and two inches at the neck, you are close to having excellent posture. If not, your posture may need professional attention to restore the normal curves of your spine.
The Mirror Test- (Anterior View) Stand facing as full length mirror and check to see if:
1. your shoulders are level
2. your head is straight; no chin deviation; ears are level
3. the spaces between your arms and sides are equally spaced
4. your iliac crests and hips are level
5. kneecaps face straight ahead
6. a 5° foot flare is shown
7. arches are not flat
8. there is no Achilles deviation, and
9. no evidence of scrunching of the toes
Check for the following:
1. head is erect, not slumping forward or backwards; no anterior head carriage
2. chin is parallel to the floor; no hyperlordosis
3. shoulders are in line with the ears, not drooping forward or pulled back,
4. stomach is flat; neutral spine
5. knees are straight, and
6. pelvis is neutral (slight anterior tilt)
Correcting Postural Faults
A patient’s postural faults must be accurately diagnosed before they can be effectively corrected. Examination and diagnosis should include the following:
• observation of the patient as they sit and move about
• measurement or estimation of the deviation from the ideally erect postures using plumb lines, inclinometry, and posture guides
• three dimensional analysis
• spinal segmental alignment
• flexibility tests
• muscle length and strength tests
The importance of muscle testing to postural analysis can not be over-emphasized. Also, much of the specific therapy in posture correction relies on muscle tightness and weakness found during the examination.
Conventional Corrective Therapies
Five main modalities are employed in the conventional treatment of faulty body mechanics and hence postural faults: chiropractic treatments; hydrotherapy; soft tissue work (MRT); and stretching and strengthening exercises. Shortened agonist muscles must be stretched before the antagonist muscle can be optimally exercised to increase their strength, or vice versa. Depending on the condition, manipulation may also be required to release and accompanying fixation.
Orthotics
Often postural faults are the result of a leg length discrepancy; either functional or structural (anatomical.) Correction of functional shortness involves a number of factors. First, correction of any structural faults has to be made to allow for the normal weight distribution and normal functioning of the joints and muscles involved. This is done by correcting any muscular imbalances (right vs. left and front vs. back) that become apparent. Adjustments allow all joints to function under a proportionate weight distribution which is essential as they are the holding elements for muscles. Lastly, orthotics are prescribed to maintain any structural discrepancy remaining.
Article submitted by Dr. Crysta Serné
Vancouver Chiropractor and owner of Vitality Clinic
(original article provided by Dr. Weatherall at http://www.advancechiro.on.ca.)
]]>Here are my three FAVOURITE stretches for the upper body. Although they are generic, they should not be performed with out speaking to your health care provider first. Please DO NOT attempt these stretches if you have shoulder, neck, or upper back pain that has not been diagnosed!
Wall Angels
This is a great stretch and strengthen exercise as it stretches your anterior shoulder and pectoralis muscle, but it also helps strengthen rear deltoids and rhomboids. This is vital for proper joint mobility and spine alignment.
Ensure that when you are doing this stretch, your feet are not right against the wall as this does not allow your back and buttocks to rest flat against the wall (you do not want your back to arch, but rather keep its natural curvature.) I stand about a foot away and then lean back, with my knees slightly flexed.
Once you’re in this position, if you want to challenge yourself further, slide your arms up against the wall to the end up straight overhead. Always keep your wrists and elbows firmly against the wall throughout the entire movement.
Eagle Pose
I am only offering the arm component of this yoga pose but do recognize their is a leg componenet to make it a true “Eagle pose- Garudasana”
Open your palms. Cross your left arm to your right. Raise your right arm with your hand stretching towards the ceiling. Bring your palms together as close as possible, depending on your flexibility. Your fingers should be pointing upwards. Make sure you don’t let the shoulders migrate up. To increase the depth of the pose, slowly raise your elbows towards the sky- you should feel it in the posterior aspect of the shoulder, tricep, and across your upper back.
Yoga Mudra
This is a great stretch for the anterior shoulder, bicep, pectoralis, and back. Once seated on your heels, exhale, place your arms behind your back, and interlace the fingers together. Draw the shoulders away from the ears and squeeze the shoulder blades together to press out through the sternum. Inhale and arch the chest up towards the ceiling. Keep the chest open as you exhale and hinge at the hips, lowering the forehead down to the floor (optional). Lift the arms up as high as you can keeping the palms press together if possible.
The above stretches can be modified to your individual needs, so please ensure that speak to your health care provider prior to attempting any of them.
Enjoy!
Dr. Crysta Serné
Vancouver Chiropractor and owner of Vitality Clinic
*If you have an injury, or have never attempted to perform these stretches before, please consult with your health care provider. Vitality Clinic and Dr. Crysta Serné assumes no responsibility.
Related Articles:
Care of Head, Neck and Upper Back
Stretches for Nursing Moms (or anyone else with stiff upper Back)
Posture at Work
Correcting Faulty Posture
In order to maximize your muscle’s strength while performing any exercise, technique is critical. Here is the ideal position and technique for a bicep curl…
Point #1– The first point to consider is your carrying angle- it is the angle your arms make relative to the side of your body. Let your arms drop naturally by your sides and then open your palms so they face forward. This is your carrying angle; the position you should always perform your bicep curl at as it maximizes the space your bicep tendon has at the shoulder.
Point #2– Never let your arms fully extend at the bottom of the curl. When you fully extend, you lose the contraction and you place more strain on the tendon and joint. Keep your arms at about 160 degrees. You may want to drop your weight down a bit as you should fatigue more quickly keeping the contraction through the entire set.
Point #3- Pay attention to wrist position. They should remain planar (completely in line with your arm) through the entire curl. Often, especially with increased weight, individuals have a tendency to flex their wrists towards their body when performing the curl. Unfortunately, this is making the curl easier and you’ll just end up with really sore forearm muscles.
Point #4– Lower back. Always ensure you have the rest of your body in mind when performing any exercise. Pelvic tilt (belly button tucked under) and keep your knees slightly bent to avoid any unnecessary pressure through the lower back. If you are unsure whether you are rotating your torso or arching your back, stand against a wall while doing your bicep curls. If you notice you were doing either, your trying to lift too much weight so drop down a few pounds.
Have a great weekend!
Dr. Crysta Serné
Vancouver Chiropractor and owner of Vitality Clinic
It is a common misconception that if your lower back is hurting, you should stretch it. Although this is often true for a lot of lower back ailments, it is not the case for all. Please DO NOT attempt these stretches if you have low back pain that has not been diagnosed!
1. Child Pose
This is a great pose designed to stretch out the paraspinal muscles (the muscles that run along side your spine). Ensure that the buttocks is as close to the heels as possible to maximize the effect of this stretch. However, know your limits and don’t push your body beyond what it is capable of!
2. Double Sided Spinal Twist
I find this a great stretch for the lower back. I never recommend that patients attempt to do a single leg twist as they will often malposition themselves and cause pinching of their SI joint. If you find it challenging to lower both knees to the floor, stack some pillows under them so that you can ease into the stretch.
3. Hamstring Wall Stretch
One of my favourite stretches as it is a very gentle stretch for the hamstrings, and the lower back is in a neutral positon while esting on the floor. It also allows for one to see if the legs are different lengths when they rest against the wall so you can correct for it.
4. Glut Cross Over Stretch
When doing this stretch, make sure you hug your leg tight to the chest to maximize the stretch. You should feel the stretch right behind the hip of the leg that is crossed over, but often in other locations as well.
The above stretches can be modified to your individual needs, so please ensure that speak to your health care provider prior to attempting any of them.
Have a great week!
Dr. Crysta Serné
Chiropractor and owner of Vitality Clinic
*If you have an injury, or have never attempted to perform these stretches before, please consult with your health care provider. Vitality Clinic and Dr. Crysta Serné accepts no responsibility.
]]>Are you training for a half marathon or marathon this summer? Using running as a cross train or a way to get in shape? These simple tips will help keep you pain free for longer – you just need to look at your feet! Or rather, your shoes …
If you are running in an older or worn pair of running shoes you are at an increased risk for running injuries. Running shoes lose cushioning, stability and shock absorption over time. One way to prevent these injuries is to know when to replace those old shoes.
Below are some tips and tricks to keep in mind when considering buying replacement shoes.
1. The mileage on your shoes is high. It is a good idea to replace your shoes every 600-800 kilometres. This is somewhat dependent on the surface you are running on, your body weight and running style. Smaller runners can get away with longer, running in rough terrain decreases the lifetime of a shoe, as does heavier runners.
2. You’re feeling pain.
If you’ve been feeling muscle fatigue, shin or calf pain or some pain in your joints — especially your knees — you may be wearing shoes that have lost their cushioning. When you’re feeling pain on both sides — both knees, for example — that’s often an indication that you need new running shoes. It’s also often an indication that you should see your Sports Therapist or Chiropractor to work out the kinks in your lower kinetic chain.
3. Your shoes fail the twist test.
If you hold your running shoes at both ends and twist the shoe, it should feel firm. An old shoe or one that doesn’t have proper support will twist easily, like a dish rag.
4. The soles have worn out.
Soles typically last longer than the shoes shock absorbency and cushioning so if the soles are worn down, then it’s definitely time for new shoes!
5. Newer shoes feel much better.
Some experts recommend that runners rotate two pairs of running shoes. If you get a new pair of running shoes about half-way through the life of your old ones, they can serve as a reference to help you notice when your old ones are ready to be replaced. If you notice a big difference in the cushioning of the newer pair, then it’s probably time to say goodbye to the old ones.
If after replacing your shoes you are not quite healed, a visit to your Chiropractor, ART Provider, and Massage Therapist is a good idea. You may have built up some scar tissue or joint restrictions that need to be released!
Enjoy the weekend,
Dr. Laura Clemenhagen
Chiropractor and ART Provider
]]>
Winter is almost here and as promised, here are a few guidelines for hitting the slopes to avoid unnecessary injury. While skiing and snowboarding come naturally to some, others spend most of their time unsuccessfully negotiating the equipment and terrain. Whatever your level of experience, either sport can be hazardous and contribute to injury. Prepare youself for the slopes by minimizing your risk of injury through spinal alignment treatments, sport specific strengthening, and warm up and cool down programs. This approach will maximize your time on the slopes.
To avoid injury this snow season, consider the following:
“Prehabbing” for the slopes
Begin to incorporate chiropractic treatments and sport specific exercises into your regular exercise routine at least eight weeks prior to the season. This will promote proper use of the muscles and joints required for your preferred sport. Strengthen the muscles specific to snow sports (quads, hamstrings, gluts, core stabilizers, and triceps) to reduce the risk of injury and increase your enjoyment and endurance on the slopes.
Look after your back
A neutral spine and strong core are essential for minimizing injury.
Here are a few general stretches of the lower back, hamstring, and psoas and quad.*
Warm up, stretch, and cool down
Before hitting the slopes, warm up like you would with any other sporting activity. Stretch your thigh, calf, and arm muscles. Ensure you are adequately warm prior to taking to the slopes (make sure you also do this after each rest break.) Once you have finished skiing or boarding for the day, remember to cool down, especially if you’re travelling home in a vehicle. These activities will better prepare your body to avoid injury.
Ski or snowboard within your capabilities
Beginners should take advantage of a ski lesson and not succumb to the pressure of keeping up with experienced skiers/boarders. Don’t be afraid to rest when you find yourself getting tired. Fatigue can certainly increase your risk of injury. Injuries often happen on that last run of the day!
To avoid injury on the mountain this winter, consider booking an appointment to discuss how to best prepare your body and ensure your season is injury free!
Enjoy the week,
Dr. Crysta Serné
Chiropractor and owner of Vitality Clinic
*If you have an injury, or have never attempted to perform these stretches before, please consult with your health care provider. Vitality Clinic and Dr. Crysta Serné accepts no responsibility.
]]>